Thursday, November 29, 2012

It's starting to look a lot like a Silver and Red Christmas


Silver and Red Christmas

Looking to make something special for your Christmas table this year? Not happy with the high cost of table decorations? Why not make some stunning - yet simple to make and highly personalised - table decorations this year?

Just using a few simple and standard stash items, I have created a Silver and Red themed Christmas Decoration for dining and gift suggestions. Use these to coordinate your festive table and gift giving. By using just a few of the same simple items, you too can save money and have something no-one else will have.

My core items are the following ribbons from the store.
Red Organza Scalloped Edged Ribbon (1m for $1.40) and Silver Fibre Ribbon (2m for $1.25)


Red and Silver Christmas Table Setting
all from products available at my2angels


Candle Centrepiece
Wrap 3 candles with red scalloped ribbon and silver fibre ribbon.  Tie off into bows and add a white large poinsettia flower to the bow centre.  Pop into a shallow bowl/plate and sprinkle 6mm red pearls, 8mm red pearls and 6mm silver stardust beads around the candles for a gorgeous table centrepiece ....


You may like to replace the poinsettia with our new Large Silver Christmas tree charms,


or our  Merry Christmas Charming Chain.
(minus the chain)


Christmas Napkin Holder


Fold a Silver Flower Wrap Filigree or Silver Filigree Wrap into a half circle to fit your napkin inside.
Hot glue a double bow from Red Organza Scalloped Edged Ribbon and
then a smaller bow from Silver Fibre Ribbon. Add to the red bow and


Christmas Crackers

Each year I make my own Christmas Crackers and put small presents inside, instead of the "bought Christmas Crackers," where the hat, jokes and plastic toys are usually thrown out. 
This way everyone gets a surprise that I know it is something they want.  

For myself, I usually put a miniature bottle of Bundy Rum inside, :)
Gin for mum and the kids usually get something small like nail polish for DD.  

Look out for another blog post coming where I will have other suggestions for what to pop inside your my2angels crackers.

Cut an empty paper towel roll in half and wrap patterned paper around it, scrunching it in at the ends.

Using a Red and White striped pp
add a bow of Red Organza Scalloped Edged Ribbon,
then add a smaller bow of Silver Glitter Ribbon
and next a silver brass round filigree
topped with our Merry Christmas Charming Chain (minus the chain).


Don't forget the Christmas Tree! 

 Here I have made a 3D Christmas Tree gift card holder from our template, 
which you can download here .... 3D Christmas Tree Template.

You can use either patterned paper or cardstock. I used a pizza box or old cardboard box though, as a strong base for the patterned paper or cardstock. This makes it sturdy enough to be reused for years to come.

I've made it using exactly the same products as the Christmas Cracker,
though this time I used the chain from the Merry Christmas Charming Chain
 to hang it from the tree.


Other red and silver ribbons from my2angels you may like to use are ....

Red Glitter Ribbon 
1m for $1.30
(a soft easy ribbon that makes it easy to tie bows with)


1m for $1.10


1m for $1.10


5m for $1.10


I'll be back soon with more Christmas colour combinations
and
Christmas cracker suggestion .. all using products from my2angels.


Come and join us in the my2angels 12 days of Christmas Promotion starting 1st December


Each time you shop during the 1st 12 days of December and spend $12 you will be eligible to purchase 12 selected items for only 12c each.

Keep your eyes out for our newsletter, blog and facebook page on the 1st December for this amazing promotion



Tuesday, November 27, 2012

Merry Christmas with Kaisercraft

Hi everyone
Michele here today

You really need to have Kaisercraft's Turtle Dove Collection in your stash. Another vintage Christmas line, these papers include rich dark reds, soft blues, greens and browns.

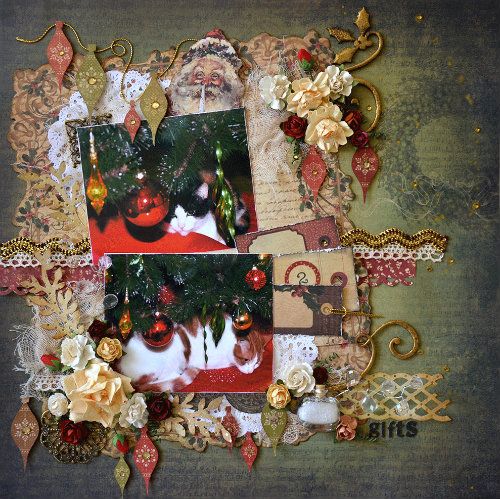
My layout for today is called ''2 gifts''. It features our two furry family members, Sasha and Tango.


The base paper is the reverse of French Hen, which is a lovely dark green around the edges, gradually lightening in the centre. This paper is covered in a tiny music pattern and has a gorgeous wreath on one side. Matching this perfectly is the die cut Glimmer, which I used as my photo mat. This die cut paper is 12 x 12 in size, so I cut mine down so that it only covers one side of my page. To do this I had to cut around about three inches from both the height and the width, so I cut strips out of the centre of the page and rejoined the edges. I used these strips later as tags in a Mini Album - nothing wasted! Once the photos and other embellishments are on the page, the cut lines are not visible.

On this layout there are quite a few layers underneath my photos. First there are two white doilies, one at the top and one balancing it on the other side at the bottom. Across the centre there are three thin strips. The first is a punched strip of Partridge, then there is a thin cream cotton scalloped lace, and on top of that some brown and gold ric rac that I found in a bargain bin at Spotlight...bargain!

On the right hand side I tucked three tags in-between the photos. All three are from To Froms - a perforated page of three different sized tags - such a good idea! The central tag has part of my title on it ... one of the ''2's'' from the 12x12 Number Sticker Sheet .

At the bottom, just peeking out from under the photo, is a scalloped border from the 12x12 Sticker Sheet (I cut it in half) and, a bit further over, a punched strip of some pretty cream and gold paper from the matching 6.5'' Paper Pad. The gold dots are foil and look perfect on the creamy paper. I also used this same paper to die cut some leaves, which are scattered around my flower clusters. These (along with practically everything else) are inked on the edges with Vintage Photo Distress Ink - my go-to ink at the moment for absolutely everything.

On to the embellishments...starting from the top.


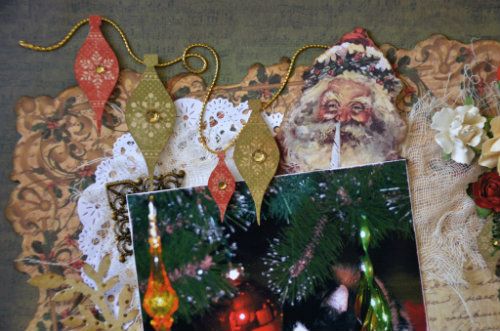
After sticking down the doily I added a piece of frayed muslin, which I think softens the stark white and adds great texture. When I add muslin I like to put down a line of Double Sided Tape around about the centre and roughly arrange the fabric around it. That way the outside areas are free of glue, but the whole is still stable so you can arrange the whispy edges easily.

Then I stuck the photo down and added a small filigree corner, cut from the Antique Bronze Square Filigree in store. Next I created a sort of banner, using pieces fussy cut from Baubles. Each has a sparkly rhinestone added and is popped up on Dimensional Tape. The gold cord was twisted and glued behind them afterwards. Santa's head peeping out from under the photo is a die cut from the Collectables Pack and covers a small piece of the join in the photo mat.


A couple more baubles are hanging on the right of the photo under a cluster of flowers. There are some Kaisercraft Mini Paper Blooms, a couple of larger Coconut Paper Blooms, some White Roses, some Red Roses and a Red 7mm Rose Bud. There is also a Kaisercraft Wooden Flourish, which has been embossed with Stampendous Aged Gold embossing enamel (oos). I left the stems on a few of my flowers and coiled them around a skewer to create tendrils.


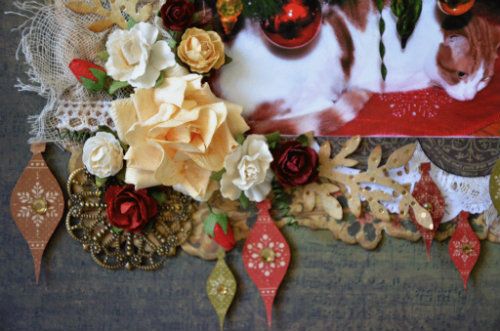
Across the bottom of the layout there are more of the same treatments. Another piece of muslin, more of the spotted gold leaves and of course more flowers. Here there is the addition of a larger cream Gardenia flower and an Antique Bronze Round Flower filigree with a Red Rose in it's centre, and more of the baubles appear to be hanging from the flowers.


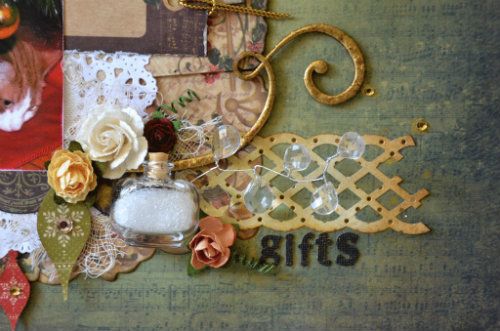
Another Aged Gold embossed flourish has been popped in under the flowers and I have filled a tiny glass bottle like the my2angels vial bottles with Diamond Dust (DD will be back in stock next week). There is a crystal branch from my stash here, balancing another one that is on the left hand side of the photos. Under this is the second part of my title - ''gifts'' - using Prima alphas.

Finally, I lightly covered my photos and some of the embellishments with baby wipes to protect them and added a spray of Gold Glimmermist over the whole right hand side of the layout. After spraying, I also flicked some larger spots of gold over the page and where these were quite prominent I also added a Topaz Rhinestone to add to the sparkle. Very pretty - I hope you enjoy  :) 


and

Kaisercraft's Turtle Dove with lots of my2angels embellishments

My OTP for Christmas this year (I always seem to do one at Christmas...a strange compulsion LOL!) is an  Advent House that I have had in my stash for a while now. It is finally seeing the light of day with the lovely Kaisercraft Turtle Dove embellishing it.


Before anything else, I painted all the wooden pieces with Metallic Gold acrylic paint, and before assembling it I covered the base piece with the reverse of Geese at the front and with Calling Birds on the back and sides. Sadly, when taking my photos I forgot to leave a drawer or two out so that you could see the backing paper...Geese is a pretty white and gold swirly paper that looks great with the flourishes on the roof.

The roof and chimney are covered in a deep red embossed paper from the 6.5'' Paper Pad, and the same paper is punched to add the lacey eaves at the front and back of the roof.

There are two Wooden Flourishes, heat embossed using Stampendous Aged Ivory embossing enamel (oos) decorating the front of the roof, and two die cut bracket shapes from the 6.5'' Paper Pad act as a base for the house number - 25 of course . Also embellishing the front are some metal pieces from my2angels. A large central Filigree Flower, with rhinestones decorating its centre, has two pieces of Antique Bronze Iron Chain attached to it from which dangle an Antique Bronze Timepiece and an Antique Bronze Key. On top of the chimney is a Birds Nest and inside it there are a few red feathers and a chipboard bird that has been inked on both sides with Fired Brick Distress Ink and then coated with Glossy Accents. (oos)

 I think I have used a piece of just about every paper, both the 12x12 and the 6x6 versions of Turtle Dove, to make them. Each is embellished with a number from 1 - 24 and the majority of these are from the 12 x 12 Number Stickers sheet. Each little box is decorated differently. I have added some Die Cut stickers, also from the 12 x 12 Number Stickers sheet,  Red and White Roses or chipboard embellishments. My chipboard Birds and Stars are either inked with Fired Brick Distress Ink or Brilliance Gold Ink and covered in Glossy Accents, or embossed with Stampendous Aged Gold embossing enamel. There are also some cute Antique Gold charms and some silver charms that I have embossed using gold embossing powder to change their colour. They include an Antique Bronze Door & Key, a Christmas Tree charm, a Coathanger, a Cuckoo Clock, a tiny Lantern, a Violin,  and some Snowflakes, There are also some white snowflake eyelets, and various rhinestones and pearls scattered across the whole. 
You can put the treat filled drawers into their places in order if you want to, but I prefer the fun that comes with the challenge of looking for the correct number every day :) 


The sides and the back of this project are not really meant to be seen, so all I have done to embellish them is to add a few embossed chipboard pieces. On the back there is another Aged Ivory embossed flourish and a large Aged Gold embossed chipboardReindeer, and on each side an Aged Gold Angel.


Finally, and the best bit about the front of the house in my opinion, is the amazingly cute Ideaology Lantern...when it's turned on it makes you go Ahhhh!!! The lanterns will be back in stock on Friday 30th


I hope you are all ready for Christmas - unlike me - and have a fabulous holiday season planned.
Michele 


Hi Geli here

The "Just Believe" collection from Kaisercraft is my favourite this Christmas. I just love the soft blue and rich red.  Find the range here at my2angels with the Christmas papers.
I made this layout with it:

The new mini gardenias make a pretty garland. There are gardenias in olivebrown (more cream than brown) and red, plus some black star flowers (sprayed with gold glimmer mist):
On the ends of the garland are a bell charm and a
And just a tiny bit of stitching with the Sew Easy tool and the star head.

Geli


Stock update

We are expecting a large restock order to arrive Tuesday 4th December, eg Diamond Dust, Glossy Accents, Dimensional Magic and Tim Holtz products 
and New Kaisercraft papers arriving any day now
so pop them in your wish list you don't miss out


Monday, November 26, 2012

Believe Card with my2angels Christmas White Angels

Believe Card....
Hi Keonie here popping in today to show off the White Christmas Angels,


and Red Christmas Angels which are back in stock at my2angels.


I used the White Christmas Angel
for my card


Started this card using one of the Twiddleybitz White C6 cards which are just awesome - great size and good weight for using mediums.

About half way down I then punched a whole using a circle hole punch (I used fiskars squeeze one). Dangle the White Christmas Angel (which is now back in stock...how exciting) over the hole you just made with the circle punch and roughly mark with a pencil where it will hang over the hole (this will make sense in a minute as it just means you don't put fragments or glass glitter there), and how far above the circular hole you will need to make a small hole for the brad (this will hold the Christmas Angel in place).

Now, drizzle some dimensional magic or Glossy accents right around the hole (both are OOS but back in on Friday). Be a bit liberal as you are now going to sprinkle some of the Stampendous Colour Fragments Powder Blue, and some of the Stampendous Fresh Green Glass Glitter all around the hole to create like a wreath.

Tap off the excess and store it in one of Tracy's gorgeous little vial glass bottles to use again next time. I also added some clear/white microfine glitter too just to add some extra sparkle. In the gap left at top of hole, pierce a small hole about half a centimetre from edge.

Thread a 7mm silver jump ring here and leave it open so you can thread the chain of the Christmas angel onto it (I did this about three chain rings up from the angels' head). Once you have done this, also add the extra little pearl dangly that comes with the Angel, then close the jump ring carefully so you don't pull the jump ring through the card.


OK, now where you marked the spot up higher for the brad to go, pierce this with a needle or piercer, and place a white brad through the hole but not all the way. Place the very top ring(the one with the star) over the brad, then puch the brad right through the card and split at the back to secure.

The angel should now dangle over the hole but not swing all over your wreath. I embellished this then with a little white bow. The patterned paper on the card came from the new Kaiser Mint Twist range which I punched out a few circles, distressed the edges and layered over each other. Then took a small strip of the Kaisercraft Candy Stripe paper and randomly pleated this before sticking it down with DS tape.

Added extra bling then with white and silver rhinestone chain, and using glossy accents, adhered a new gorgeous little ribbon bow charm and a bit more Stampendous glass glitter.

 Finally, add a title, some my2angels rhinestone circles, and hand draw an outline with black Sharpie pen. 

Merry Christmas !!!
Keonie

Sunday, November 25, 2012

Ribbon Tree Christmas Card

Ribbon Tree Christmas Card

Ink the edges of your Twiddleybitz 13x13 White Card with the colour you are working with.  In my case I have used Opera Pink

Cut up pattern paper to 11cm x 11cm and adhere to card.  I used Making Memories Abby Pink and also a piece of tulle behind the pattern paper for some texture.  You could use coordinating cardstock.  Ink edges of pattern paper.

Cut approximately 45cm of Silver Fibre Ribbon

Take your 7cm silver eye pin and pierce ribbon onto pin at approximately 1cm.  Loop Silver Fibre Ribbon at 6cm and pierce ribbon on pin.  Insert 8mm Pink Crackle Glass Round Bead.  

Fold 6cm of Silver Fibre Ribbon on the other side and insert onto pin.  Repeat another layer

This will give you 3cm width loops on both sides

handmade Christmas Cards

Next fold ribbon at 4cm for the next two layers and inserting 6mm Pink Crackle Glass Round Bead when completed each left hand side loop


This will give you 2cm width loops on both sides

Lastly, fold ribbon at 2cm, inserting 6mm Pink Crackle Glass Round Bead and the last layer at approximately .5cm.  trim off excess ribbon.


This will give you 1cm width loops on both sides

Put aside for the moment.

Take a 2.1cm Silver Ribbon Slide and trim a piece of coordinating cardstock or pattern paper to fit behind the buckle and adhere.  Using either foam tape or a scrap piece of thick cardboard (I used a pizza box) adhere to behind the buckle.  Don't cover fully the back with cardboard, only cut enough to cover 3/4 of behind the buckle at the bottom to allow for the pin and the height of the beads to slip in behind the buckle.

Adhere the buckle to the bottom of the pattern paper and then the tree.  I applied drops of glue behind the beads to adhere it.  Adhere a silver metal texture star to the top of your tree and you are done.

scrapbooking christmas cards


You could add dots of liquid pearls or stickles around the border of your pattern paper for more sparkle.

scrapbooking christmas cards


or for something different (and to make it less expensive) replace the 2.1cm Silver Ribbon Slide   with velvet ric rac.

handmade Christmas Cards

 It has a soft texture and the colour coordinates beautifully with our light blue organza ribbon.  I cut a small pot shape and wrapped the white velvet ric rac for the pot and light blue velvet ric rac for the rim of the top


handmade Christmas Cards


handmade Christmas Cards


Thursday, November 22, 2012

Romance Novel.....two pretty tags

Hi there, it's Michele here again. This time I'm using Prima's oh so gorgeous Romance Novel, a range of papers and embellishments that was, and unfortunately still is, SO hard to get!

What a gorgeous range of papers this is though ... black, cream and pink - combining beautifully and perfectly lending itself to shabby romantic layouts, or in this case, tags.

For the tags I used two Inkssentials Manilla Tags #8.


First of all, tag #1 was covered in a piece of Harlequin. Then the edges were inked with Black Soot Distress Ink and distressed with the edge of my scissors. I re-punched the hole at the top of the tag and added a black metallic eyelet, coloured a piece of Crinkle ribbon using Picket Fence, Spun SugarWorn Lipstick and Black Soot Distress Stains and threaded it through the hole.

Then, moving from the bottom up, my first layer is a piece of note paper cut from the reverse of the 6x6 Paper Pad version of Dear John. I punched the holes at the top myself to make it look like a page torn out of a small notebook, and attached it to the tag with tiny staples.

If you ''Like'' the Prima Facebook page you will know that they have a ''Freebie Friday'' downloadable page every week. My next layer - the definition of 'secret' is torn out of one of these that I saved and printed. The edges are inked with Black Soot again.

The next layer is the ready-made envelope that Prima has provided on Bookplate. I cut it out and assembled it before inking the edges and attaching it to my tag at a slight angle. Before assembling though, I punched two holes for my closures and added eyelets to make sure the paper didn't tear. The closure is created by the addition of two pearl headed brads I had in my stash with some Black Organza Ribbon twisted around them and tied in a single knot. This is just the right size for a gift card and is a great way to wrap one up!

At the top of the tag I added a few extra bits of bling. Hanging from an Ideaology Hanger Clip (oos) are two my2angels hand made chains. I got these from Tracy a long, long time ago attached to a silver butterfly charm. I ditched the butterfly (sorry Tracy LOL) and used the chains alone here. They're totally gorgeous! All you need to make your own chains - the Silver Chain, Bead Caps, Head Pins and Beads - are here at the store, or alternatively you could use any combination of my2angels Charming Chains. They're perfect for tags and cards as well as for making your layouts special.

The flower cluster you can see is made up of two Romance Novel Perles Roses, a piece of Say it with Crystals Mini Swirl and a black and silver rhinestone flower cut from  Black Flowers Acrylic Chain.


The rest of the Mini Swirl is at the bottom of the tag, along with another pink rose and another flower from the Black Flowers Acrylic Chain. To finish up, I added a Romance Novel Decorative Wood Ticket - Beautiful Whisper.

My second tag is the same as the first to start with, except that it is covered with a piece of paper cut from the gorgeous Emotion paper. Again, everything is distressed and inked with Black Soot Distress Ink.  I cut an extra piece from the same paper, slightly smaller than the tag in width, to create the lacing at the bottom.


After distressing and inking the edges, I tore a triangular piece out and set some small pink eyelets into the edges. I tucked a piece of frayed muslin into the gap and laced the edges together with Black Organza Ribbon. The top of this extra square of paper is covered by the next layer - "Notes" - cut from Bookplate. Another of those Freebie Friday definitions is torn and stapled to the Notes paper, and a tag, also cut from Bookplate, decorates the edge.


This time the top of the tag is decorated with a my2angels Mum Pink and Silver Charming Chain, this time it's minus the ''Mum'' (oops!) and is hanging from an Ideaology Mini Paper Clip. The flowers are a Black Prima Rose and a White Rose coloured with Vintage Pink Glimmermist. Peeking out from behind them is another sparkly flower from the Black Flowers Acrylic Chain and part of another Say it with Crystals Mini Swirl.


At the bottom, along with another Prima rose is yet another Black Flowers Acrylic Chain piece, the rest of the Mini Swirl and a pretty Pink Rose Bud.

Have fun with Romance Novel ... I did :)

Michele xx


Wednesday, November 21, 2012

Fun and easy to make for your teachers or friends

Are you looking for something personal and fun to make for your kids' teachers or your friends? Should it should be cheap and quick to make, but not look cheap? I've got a great idea for you to copy:
Bottle cap magnets!
Bottle cap magnets
Here is what you'll need (click on the words to find the products at my2angels):


Bottle cap magnets

3. Some paper with small designs (use up some bits from your stash)
4. An unused bottle cap (from the home bewery section at Woolies)
5. A magnet (from the cheap shop) 
Bottle cap magnets

Cover the cabochon with Dimensional Magic, place it on the design you want and swirl it around a little to spread the glue and pop any air bubbles.
Bottle cap magnets

Let it dry for about half an hour.
Now on to squishing some bottle caps!
If you have a Cuttlebug or similar machine, you're in luck. Make the following sandwich:
B plate
metal die
bottle cap (pointy bits up)
A plate
Bottle cap magnets

It will look perfectly squished. 
If you don't have a Cuttlebug and can't rush out to get one this very minute, don't despair. Lay your bottle cap with the pointy bits down on a wooden cutting board and give it a few hard taps with a hammer. It's not as perfect, but looks ok too.

Bottle cap magnets
  
Check your glued-on cabochon. Is it completely dry? Then cut it out. It doesn't have to be perfect, just follow the outline of the glass pebble.

Put some strong glue (I use Helmar 450) on the inside plastic rim of the bottle cap
Bottle cap magnets

Glue the cabochon on.
Bottle cap magnets
 Glue a magnet on the back of the bottle cap.
Easy, right? For a present I made 6 matching ones.

Now you need some presentation. 
Cut out a tag from Snowflake paper (there are 9 on the sheet, so that will go a long way). 
Bottle cap magnets
 Glue 6 small metal washers on the backside of the paper. They will hold your magnets in place.

 Pop the magnets on the front, add some red baker's twine and a Christmas tree charm. Wrap it in a bit of cellophane and you are done!
Try and match the paper you use to your teacher's taste. My daughter's male teacher is getting monsters!

GELI