Sunday, February 23, 2014

7Dots 2014 Winter collections up for pre-order

Are you bored with your usual paper ranges? Has nothing released lately caught your eye? If so, then check out the 7 Dots Studio Winter 2014 Collections - now available for preorder on the my2angels website here

You asked for it - you got it. So many of you have asked us to get in the new collections  from 7 Dots, that we had to go check them out for ourselves and (since both Ngaire and Michele promised to be good and scrap something with them) they really are amazing!!

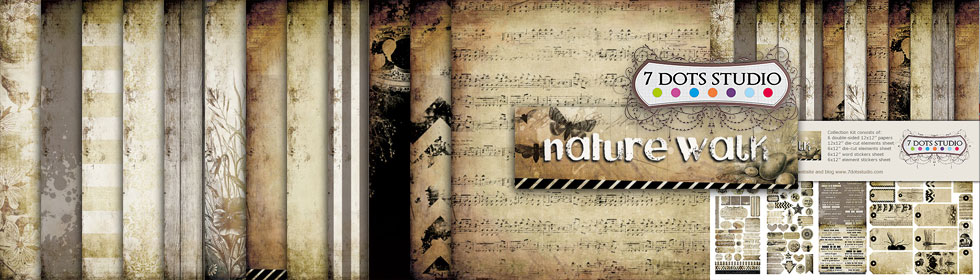
Check out the gorgeous colour combinations and patterns in these upcoming ranges. So versatile - scrap to the pattern or use them as the base for a mixed media layout - either way, these papers are sure to inspire.

Cold Country collection

Illumination collection

Nature Walk collection

The Australian Supplier has advised they will be receiving a HUGE shipment of the new 7Dots Studio Collection in late March (as long as there are no delays in customs), which means we will be posting all preorders in early April.

Please submit your preorder as a separate order on the website and pay prior to 1st March.  Sorry for the short notice, but we have had so many requests for these collections that we need to get our order in as quickly as possible to avoid missing out on any items.

 We can't guarantee these much anticipated collections will be available after the pre-orders. Demand looks set to be very high for these ranges.

If you are not familiar with the stunning ranges this company produces or the amazing creations other scrappers have made with them - check out the blog below.

Link to the 7Dots Studio Blog


Friday, February 21, 2014

Playing with felt ribbon

Sometimes we need to look past the familiar to see the unexpected.

Sounds deep and meaningful doesn't it? But all I mean by this is that it's possible to use some of your basic scrapping elements in new and interesting ways, just by looking past the 'usual' way you use them and doing something completely different.

So today I am here to show you a few 'different' ways to look past a strip of our felt ribbon and create new felt embellishments.


Let's start with an embellishment for a friendship ATC.

Taking a piece of our pink butterfly and flower felt ribbon (whoops I used a white piece for the example but I am sure you get the drift!), cut an individual scroll piece out as shown.


Add a silver Friends charm, a pin, pink rhinestone - and to finish - a pink rose as decoration.
(I coloured my charm with glimmer glaze.)


Emboss an ATC card by stamping with a floral pattern using Shabby Pink Embossing Enamel (now back in stock).


Ink the edges with Spun Sugar Distress Ink and add a piece of our 'Girlfriends" ribbon to the bottom edge of the card.


Now it's simply a matter of popping on your "friends embellishment" to the card over a white mulberry flower.


We can also play with the white butterflies and flower felt ribbon.

Cut out some individual scrolls and a butterfly.


Now make a cup of tea (no sugar or milk!) and pop your butterfly and scrolls in to soak. Hmmm - reminds me of Madge and her "you're soaking in it ad" - or does that show my age too much??


Go and have a real drink while the felt "colours" ... the number of glasses you get to drink is determined by how dark you want the felt to be.

I only wanted a light colouring - so this is a one glass butterfly.

Don't forget to let it dry out fully before you use it. Depending on how dark you 'coloured' your felt - you might need to dry out too. :)


Punch out a piece of acetate, ink the edges and adhere your butterfly to it (don't stick down antennas) over a piece of tulle. 

To embellish your felt piece, add a filigree butterfly and brown rose to the centre.


Add to the centre of the card.


Pop on your (now dry) felt scrolls and some small roses and you have a sweet, vintage themed card suitable for a variety of occasions.


How about a felt photo corner?  Such an easy embellishment for a very pretty layered effect!


Simply cut out some flowers, add a pink rose to the centre and ta da ...


There you have 3 easy ways to add felt to your layouts - I am sure you can think of many more.

With our felt priced at 50%, you can afford to get a variety of colours and styles. 
They are all available here in the store.


Sunday, February 16, 2014

Vintage Travel Layout - Journey

What better combination for a vintage travel layout than Kaisercraft's 75c range and our very own my2angels Holiday Travels Embellishment kit!

The photo is an oldie of my mother and my grandmother in front of the old family car.

Scrapbooking Travel Layouts

I started with three layers of paper - the reverse of Dime and two sheets of Shilling:- first the main side and then the reverse with its three gorgeous butterflies. All the edges are distressed ... a little bit torn in places too.
To give the impression of extra layers underneath, I put in a few strips of torn tape around some of the edges. Aqua Filmstrip and Vintage Labels coordinate beautifully here too.
Scrapbooking Travel Layouts

The topmost layer has a little more detail added to it . I started by punching one edge with a fan punch. Then I sprayed a puddle of Apple Glimmermist onto the page, letting it drip down over the edge, blotting off the excess with a paper towel. This shade of green links the aqua paper to the black and greeny-brown brocade one underneath it.
The background stamps - both black and sepia - are covered with a watery layer of gesso to tone down the contrast.
I also used a rub-on (You never know when you're making a MEMORY) in the top left corner and a JOURNEY word stamp from the Holiday Travels Embellishment kit. (Shh! Those two Journey stamps right in the middle were just for practice ... my photo is going right over the top of them. The postmarks - which will also be hidden - are also in the Holiday Travels Embellishment kit).

Next a bit of white Gesso for texture - first a few splotches with a paintbrush and then a honeycomb pattern using the 6" version of Crafters Workshop Hexagons. I scattered some brown Sugar Beads into the splotches and later made sure they were good and stuck by adding Crackle Accents over the top.

Scrapbooking Travel Layouts

I roughened the edges of the photo with an emery board and matted it with three layers. The small cream corner is a tag from Pound, followed by two pieces from the 6.5'' Paper Pad. There are some lovely papers in there that are not available in the larger size. I then wrapped some string around the three layers and then added something unique from my2angels to the knot.

Scrapbooking Travel Layouts

My charm is made up of a Bronze Circle Pendant and the cute little car that comes in the Holiday Travels Embellishment kit. First I added a circle of brown patterned paper, then I filled the circle with Crackle Accents and finally I dropped in the car. When it was dry, I rubbed in a bit of Inka Gold and I love the way it came out. I am now searching through my extensive collection of charms for other things that fit perfectly into that frame.  :)

Scrapbooking Travel Layouts

There are a few bits and pieces tucked in around the top of the photo. From the 6.5'' Paper Pad, two pieces cut from one tag, the die cut leaves and a tiny butterfly under a glass Cabochon. The tickets and the circular rub on are all from that awesome Holiday Travels Embellishment kit - I got my money's worth from that kit on this layout and there's still a lot left for the next one!!

Scrapbooking Travel Layouts

At the bottom, I've overlapped the wooden handmade tag (from that same kit again) with a brown tag with some 'kit' postmark rub-ons applied to it (from the 6.5" Paper Pad). 

The flower cluster ... is a collection of some more die cut leaves, a large Black Rose, some Brown Cherry Blossoms, smaller White roses, some tiny Black and Creamy Yellow Roses and a few Black and White Rose Buds.

Scrapbooking Travel Layouts

Thanks for looking :)

Michele xx

Thursday, February 13, 2014

Old Timers and how to get the most out of your charms!

Have you seen the new gadget gear cog charms (see them here)? They are just awesome and the perfect layout embellishment for boys, teens, men and all things needing a bit of an industrial feel.

They go perfectly with the Kaisercraft Garage Days collection


I have already shared how to emboss with a charm using a Cuttlebug or Bigshot (click here to see the full post), but you can emboss them without a Cuttlebug too. The best thing about this method is that you get to use them again on a different project! Read on for more details.
♥♥♥
First, let's do some random stamping in the upper half of a Nuts & Bolts paper using any background stamp. You can find lots of great background textures in the stamps section here


In my latest clean-up, I came across some old letter die-cuts that went into the "use it or lose it" pile. They matched my project perfectly, but they are sooooo old, please don't ask me where to get them.

You can punch, die-cut, hand-cut or nibble out several 1" circles and rub on or stamp some letters on some of them to make a title. Ink around the plain ones and rub Inka Gold (Champagne) around the letter circles. 


Now arrange them on the top 7" of your background paper. I kept them quite random, but in vertical lines, so I can stitch over them later. 


Tear and layer the front, back and barcode strip of the Tyre Shop paper

Sew across the circles (skip the letter circles) and around the edge of the layered bottom papers. You can be really rough and messy. 


Put one of the cog charms under the background paper and rub over it with a stylus or anything fairly blunt (you don't want to tear through the paper). 


The outlines of the cog will be visible, but not very clearly, so we'll highlight them by rubbing some ink over them. Again, embrace the messiness! 

 There you go, lots of little cogs and you still get to use the original one elsewhere! 

 This is now a pretty cool background and only needs a photo and a few more embellies. I cut some tags from the Spare Parts paper and teamed them with a felt star, a cap charm, a LOL charm, some more cogs and a ball & chain


 So go and get some of the new cogs and gears and have some messy fun!


Geli

Wednesday, February 12, 2014

2 new classes at my2angels

Come and join us for some fun at our 2 new classes just listed at my2angels. 

Accommodating for both male and female layouts, these 2 classes will ensure you get your hands messy while having fun with texture pastes, mists, stamping and inka gold. 

Deposits are required to secure your spot. 


US
  
Mixed media layouts

Playtime 
 
Mixed media layouts


 To book head over to the class section on the website 


Monday, February 10, 2014

my2angels Embellishment and Layout Class

We know there are many of you out there who enjoy our Embellishment Classes.

The layout classes are popular as well.

So we thought why not combine the two? Have a class where you not only create your own personalised embellishments, but where you then go on to use them on your own layout.

So here is our 2014 Embellishment Class with a twist ... where you will create a layout at the end of the day using a few of the embellishments you created in class.

Classes are limited to two dates.

Date: Sunday 9th March
and Sunday 16th March

Time: 9am to 5pm

What to bring: Photo/s to fit on 5x7 mount, quick drying clear glue(dimensional magic or glossy accents) and your basic tool kit.

Cost $70.00
(All materials will be provided except what is mentioned above)

Lunch will be provided (Subway lunch with juice, tea and coffee on tap all day).
Please bring some nibbles for morning and afternoon tea.

Here are just a few of the products you will be using to create (at last count) 6 unique embellishments (with extras to take home) ...  with 4 weeks still to go, I am sure I won't be able to stop at 6!


and here is an example of the type of layout you will create with 2 of your class embellishments (You choose the colour of your choice, it doesn't have to be pink or black).


Grab some scrapping buddies and come for a fun, craft-filled day.
Be quick to book though, as in past years, these classes have sold out quickly.
To book go to our class section on the website.


Tuesday, February 4, 2014

Viva Inka Gold in store now and more goodies ...

Stunning new colours of Inka Gold in store now!


If you haven't tried it you MUST!  Viva Decor's Inka Gold  produces an amazing metallic finish without any toxic chemicals. With beeswax as one of the main ingredients, Inka Gold is safe and easy to use in all crafting and home decor projects.

Look at how it colours our charms and dries in seconds.


Viva Inka gold

Viva Inka gold

Viva Inka gold

Viva Inka gold

More colours are available in the new arrivals section, but we need to warn you they are selling out fast (and addictive!) so get in quick!

Tip:  Always keeps the jar lid closed as will dry quickly.  If this does happen just add a drop of water and rub into the Inka Gold.


We also have new charms which we know you can use on your creations!

Viva Inka gold

Viva Inka gold

Set of 3 Baking Charms
Viva Inka gold


and pretty ruffled ribbon
Viva Inka gold

Viva Inka gold

They are all available here in the new arrivals section


Viva Inka gold