Showing posts with label Weddings. Show all posts

Wednesday, May 27, 2015

The Colours of Tuscany

You will all know that my beautiful daughter was married to the man of her dreams in Tuscany last September....they have featured in a couple of my projects since then, and I have found that while the colour of the wedding was blue, the muted colours of the Tuscan landscape also suit my projects to perfection.


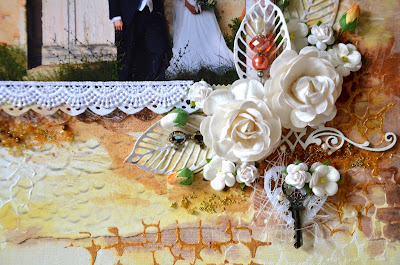
The one I have just finished focuses on the warm terracotta and cream of the beautiful old buildings that dot the landscape - and a photo I just love.


I jumped out of my usual comfort zone for this one and started with a 12x12 piece of chipboard covered with a sheet of sticky-backed canvas. I layered on a few torn pieces of patterned paper (from 7 Dots Studio's Domestic Goddess range), sticking it down without worrying too much about the edges, and painted it all over with white gesso. When it had dried I pulled out a stencil and added random patterns all over - first with Gesso again, and then with Viva Decor Ferro Metal Effect textured paint. I used Gold.

Again, after it had dried thoroughly, I wet the page again where I wanted to add colour - I didn't spray - I used a paintbrush with yellow Jingle Bells and brown Suede Glimmermists. The colours run beautifully, and I prefer the control you get with a brush. I've never been a great sprayer!

My photo is mounted on two pieces of the same paper I used on the background - one sheet was enough for the whole layout. Then to add depth I used Dimensional Tape to stick it to the background.

There are also three layered strips of lace - 2 die-cut paper, and one fabric


Embellishing is easy with my2angels products and a few pieces of chipboard. I have used a lot of flowers - Large White RosesWhite Sweetheart BlossomsWhite 1cm RosesWhite 7mm RosebudsTangerine 1cm Roses, Tangerine 7mm Rosebuds and some tiny White 3mm Rosebuds.
Several Die Cut leaves fill out the clusters and I have also added a small bronze pair of glasses from Tracy's HUGE collection of Charms and a pretty Charming Pin.


Right down in the bottom corner is a beautiful hand made felt heart & key embellishment from the Antique Wings & Things kit and I finished the layout off with a scattering of Gold Micro Beads and Golden Crunch Sugar Beads in several places. These I stuck on with a combination of Ranger Matt Gel Medium and Glossy Accents, so they're really not going to fall off :)



Saturday, January 10, 2015

Sweet Purity Wings & Things - just perfect....

... for a wedding layout.

Tracy sent me a sample of her beautiful new Sweet Purity Wings & Things embellishments. Do you think she knew there might be a wedding layout coming up some time soon?

So here it is - the first of many - I'm sure. This one's title is ''Dance''.

Scrapbooking Wedding layouts

 
It started off as a piece of 7 Dots Wonderland paper, mounted on some Kaisercraft Navy Weave cardstock for extra strength.
This paper is already pretty busy, so I just added a bit of texture using a stencil and Viva Deco Modeling Cream. It has a lovely pearly shimmer in the right light. With a paintbrush and a lot of water to dilute it, I added some blue acrylic paint and pools and spatters down the page.

Scrapbooking Wedding layouts

When that was all dry, I distressed and layered a few pieces of patterned paper and mounted my photos on a small piece of corrugated cardboard (small enough so that it doesn't show) to give it height. I also die -ut some leaves and some tattered lace.

That piece of white Velvet Ric Rac was going to be in there when I took this photo, but in the end it didn't look quite right and didn't make the final layout. Maybe next time!

I added a strip of White Acrylic Rhinestone Chain to the top of the Tattered Lace.

Scrapbooking Wedding layouts

Embellishing is so easy with Miss Tracy around!  ;)
The gorgeous wing from the Sweet Purity set was joined by another 1cm White Rose, a White Foam Stamen, pieces of Blue Pearl Garland and a 16mm Acrylic Rhinestone.

Scrapbooking Wedding layouts

Down at the bottom is a White and Silver Dance Charming Word...with a little bit of blue acrylic wash tinting the muslin, an extra White Rose and two White Foam Stamens added.

Scrapbooking Wedding layouts

And in the bottom corner -  another rose (this one is a bit bigger), more White Foam Stamens and another Acrylic Rhinestone.

Scrapbooking Wedding layouts


Adding a bit of final sparkle to the layout, I sprinkled on Diamond Dust, some extra fine white glitter and a scattering of Crushed Ice Sugar Beads. To attach them all I randomly squeezed some Glossy Accents straight onto the paper, then sort of pushed the beads, dust and glitter into it with a paintbrush. The photos here don't do it justice, the sparkle is SO pretty!!

Not my usual crowd of flowers in this one - and not really much colour either, but I like its simplicity. Try it yourself - I'd love to see the results!

Scrapbooking Wedding layouts

Wednesday, July 7, 2010

From L Plates to a Wedding

First up today is from Tracey with her Black & White Layout and a splash of Kraft

Shop Products
Imaginisce To Love & Cherish Diana
Teresa Collins Mr & Mrs Ledger
Velvet Ric Rac - White
10 Large Journalling Tags
Tree Charms
Leaf Charms
Zing Opaque Embossing Powder Glitter Black
AC Foam Thickers Daiquiri - Black
Carolees Creations Tiny Black Alpha Stickers
Versa Color Cube Ink Pad - Black


Other Stuff
Tim Holtz Grungeboard
Dymo Labeller
Paper String
Page Maps Sketch


And from Keonie our Guest Designer for July (who BTW is running Scrapalatte here on the Gold Coast - see our resource then events section for more details)

This LO is of my beautiful Mum on my wedding day and was completed using the gorgeous new Imaginisce To Love and Cherish papers.


I absolutely love black and white so theme for this month of Black and White suited not only me, but also these papers perfectly.

The heart in the middle is the Scrapware filigree chipboard heart which was first painted white and then embossed with clear embossing powder.


Since completing this LO though Tracy has got in some cool new embossing supplies including the Ranger Embossing Puffs which are gorgeous and give a flocked effect. Your Scrapware heart will come in two bits – the solid bit at the back, and the matching filigree heart for the front.

I simply covered the solid heart in the polka dot Imaginisce paper, then tied the painted and embossed filigree heart over the top with black ribbon. You can bling up the heart too by adding some sparkly stickles over the top and adhere some rhinestones amongst the filigree pattern.

To carry on with the heart theme I also attached a gorgeous little silver heart locket and mini key charm to the bottom part of the ribbon. (these are the free gift with your first purchase in July)

Spritz some pink stem flowers and Canna lilies with glimmermist and arrange them around the heart adhering them with strong adhesive. To finish off the LO I then added the rhinestone title, some mini pearls, and ruled a very fine border around the outside of my photo and extended it down onto the white patterned paper. This just ties the whole LO together and frames the photo.
Another cool thing to try is grab yourself one of the Ranger Ink blending tools, and using black ink distress the edges of the white polka dot patterned paper.
There is a tutorial on ink blending tool in the Tutorial section under Resources of my2angels if you haven’t used one of these must have tools before! I did one thing a little differently on this LO too, instead of adding journaling to the main page, I chose to journal on a little tag, distress the edges with pink ink and the ink blending tool, and then attach it to the top left hand corner of the LO using a brad, organza ribbon and one of the flowers cropped from the patterned paper. Therefore the tag can be pulled to the front of the LO if you wish to read the journaling, then simply tucked back in behind the LO.

Thanks ladies for the wonderful inspiration and Tracey thanks for the idea, durrh I can't believe I didn't think of it sooner! I am always borrowing mums punch which gives the notepad ripped effect but use the Teresa Collins ledger paper like you have done, hole punch the side then rip them!!!
How easy is that!

Hope the girls gave you some new ideas
TFL

Thursday, June 24, 2010

From weddings to babies


I finally have made a start on my brothers wedding photos (he was married in 2003!)


The base for my layout is Core dinations Scarlett Cardstock, covering my homemade chipboard frame is Teresa Collins Mr and Mrs Stripe Pattern Paper and framing the photo is our Black Scroll Felt Frame

Before I go on, as my daughter and mother pointed out the large scrapware audrey mannequin with wedding dress (a silk camisole I picked up from lifeline specifically for this layout) is facing the opposite way to the photo I know I know but I didn't start this layout intending to use this photo! Mothers & daughters I tell ya!

Anyhow moving on ...


Precious Moments cut from Teresa Collins Chic Bebe Girl Mini Tags and foam taped for dimension (and to cover the staples behind - staples are the only thing I have found that will attach tuelle to paper! So plan your layout ahead if using tuelle, unlike me who decided to add the tuelle to mimic my sister-in-law's veil AFTER I had completed the layout!!!

Our mini white gardenia, red stemmed flowers, love engraved felt heart and our large silver heart locket charm. The word love is cut from the Teresa Collins Mr & Mrs Labels pattern paper


and stamped flourishes (using Stampology Double Scroll Clear Stamp which will be in stock by the end of next week) embossed AC black glitter embossing powder with red rhinestones.


And from Tracey ...

Here is a super quick layout I did using the black felt scroll frame.


Black and White Mini Gardenias - their tips highlighted with Kindy Glitz Black
23mm White Mulberry Flowers
Mulberry Paper Leaves - Green Brown and Rose
Circle Pendants
10 Large Journalling Tags
Buzz and Bloom Chipboard - that 70s alphabet


Other shop Products used:

1 Black Scroll Felt Frames
Websters Pages Life's Portrait Love Yourself
3mm Black Rhinestones Flourish
Black Flowers Acrylic Chain strip used on the photo
Distress Crackle Paint - Picket Fence White
Dimensional Magic - Clear
Versa Color Cube Ink Pad - Black
ICE Stickles Glitter Glue Silver Ice

Not sure how much creating I am going to get done in the next few weeks with the school holidays starting this Friday YUK
Anyone got a spare room for me?
I am house trained and it will only be for a fortnight! LOL