Wednesday, September 25, 2013

Back to Base Coat....

Hi Ladies,
Michele here again with another layout based on the very versatile Kaisercraft Base Coat.


This range is perfect to use as a starter for just about any grungy layout you can imagine. Everything from wood to lace for you to enhance with texture and mediums to create your own unique backgrounds.

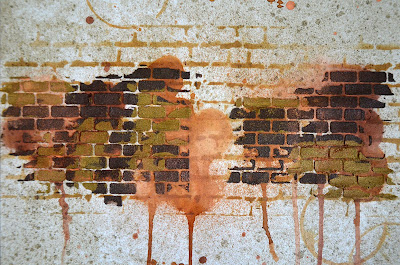
So I took my sheet of "Rock" and set about changing it completely :)


First I took a Crafter's Workshop Brick template and, with an Ink Blending Tool, added some Vintage Photo and Pumice Stone lines. Over the top of that I added some texture with a Twiddleybitz Bricks Template and some Ferro Metal Effect Texture Paint in Iron and Amber Gold. I had a cup of tea on my desk at the time, so I added a splodge of Vintage Photo distress ink to my Craft Sheet, spritzed it with water, put my mug into it and transferred the rings to my page.


Next up, some sprays to add some shimmer and a few drips to the page. I used a combination of Perfect Pearls (Perfect Copper) and Glimmermist (Coffee Shop and Suede). After I'd finished spraying I took off the lid and flicked a few drops onto the page as well.


Not quite finished yet though - I added a few lines of random stitching at the top and on the right side using a copper coloured thread . Both above and below the brick centre line there are some translucent spots. These were made with a Crafters Workshop Punchinella template and some Multi Medium. This goes on white, but dries clear so I swiped a bit of Black Soot distress ink over some of the dots to make them stand out. Most are still clear though and add nice texture and sheen in the right light.

Next I punched the bottom edge of the page, distressed the other three edges and added a border underneath the punching using another Base Coat paper - ''Bricks''.  Because the paper is sometimes a bit wonky after the heavy treatment it has received I mounted it all on a piece of brown cardstock, just to give it some strength. So that was it for the background. The rest was easy :)


My photos are mounted on a piece of my2angels Pizza Box corrugated cardboard. There's a swipe of Black Soot and Vintage Photo ink on it and the two exposed corners have Bronze Photo Corners attached.
I have die cut two bracket shapes from the Bricks paper, reversed one of them and inked the edges with Vintage Photo and Black Soot. They are tucked under the top of my photo mat. I also used "Distressed" - a wood grain paper, to die cut some autumn coloured leaves.

I really like the look of raw chipboard, but for this layout I wanted my picket fence it to be a little darker so first I inked some of the edges and fairly randomly added some Perfect Pearls mist with a paintbrush. Then I covered it all with Zing Clear Embossing Enamel. While the clear embossing enamel was still hot I sprinkled on some Stampendous Aged Embossing enamels. Aged Copper and Aged Black were used on the fence. The nest at the top of the page stayed just Clear, but the eggs have the addition of Aged Copper and Aged Ivory. I also added a tangle of thread to the nest.


Below the photos I have added an enormous pile of flowers. I love Tracy's Cherry Blossoms, and here I have used Cream and Wine, Tangerine, White and 2 Tone Brown. Also looking gorgeous are the new White with Yellow and Brown Magnolias, and Tangerine and White Roses
There are three metallic elements in there too - first two new Large Bronze Leaf Charms (these are gorgeous and I will be buying more, so hurry up and get yours!) and secondly I have cut the flower centre from an Antique Bronze Flower Filigree Flourish and added it to my cluster.


And did you spot the my2angels handmade embellishments? These make every layout unique... a brand new Bronze and Tangerine Cherish Charming Word, and a pretty Orange and Antique Bronze Charming Pin. Beautiful finishing touches.


Michele xx


Tuesday, September 24, 2013

Sunny September and making Christmas Cards already!

I groan if I see Christmas products at the shops before November and here I am in sunny September making Christmas cards! But I have to be one skip and a jump ahead of you all. Apparently now is a good time to start planning! So without further ado, here are 3 cards I made from one technique and that is rosette making!

Christmas+cards+(1).JPG

By the way, you can adapt this to suit a non-Christmas theme. No doubt you guessed that already. Maybe I'll even make a dent in my ribbon stash!!!

Rosettes are pretty easy to make! You need a cardboard circle from a cereal box (about 3.5cm diameter and it can be wonky) and mark out the quarters and eighths.

Christmas+cards+(3).JPG

Fold 1m of ribbon in half, then in half again, then again and again (4 times) so you have 16 pieces, all the same length. Cut them. They should be around 6.5cm long.
Fold each one in half and glue the ends together. I used Helmar 450 glue, you can do it with a heat gun, if you prefer.

Christmas+cards+(2).JPGChristmas+cards+(4).JPG

Start at the top mark of your circle and glue on one ribbon loop at the time. The loops point outward and the glued-together ends sit on the centre spot. 4 ribbon loops in each quarter.

Christmas+cards+(5).JPGChristmas+cards+(6).JPG

Continue all the way around and tuck the last one under the first one.

Christmas+cards+(7).JPG

Now it's time to embellish! Gather your bits and pieces and get creative. I have added a list with links to the things I used.

Christmas+cards+(8).JPG

As you can see, there are many ways to decorate the centres of your rosettes. I really like the filigrees to decorate as they look very vintage.

Christmas+cards+(10).JPG
This border filigree is especially nice tugged under. I have cut mine in half (a big pair of scissors work just fine).

Christmas+cards+(12).JPG
And here is the finished card:

Christmas+cards+(14).JPG

What I used for this card:
- square card in white
- December Documented paper in black by Simple Stories
- Bingo card by Simple Stories
- 1m satin ribbon with gold presents
- microbeads (find lots of colours here)
- golden flower from a flower chain

If the antique golden colour of the filigrees doesn't suit your project, you can rub Inka Gold over them. Inka Gold is available in many colours here, under mediums (pg 4-6). No, it's not always golden! It not only changes the filigree's colour, but keeps the classy shine and even adds some depth to the design.

Christmas+cards+(15).JPG

Here is what it looks like with Platinum Inka Gold:

Christmas+cards+(17).JPG

Christmas+cards+(16).JPG

What I used for this card:
- square card in white
- December documented paper in blue by Simple Stories (with some light stamping around the edges)
- Bingo card by Simple Stories
- metal filigree border coloured silver with Inka Gold in Platinum
- 1m satin ribbon with silver stars

And if you're feeling lazy and just want to put something ready-made into the middle, use the I ♥ family embellishments (available in lots of colours and themes in the Charming Words section here)

Christmas+cards+(1b).jpg


Christmas+cards+(18).jpg

What I used for this card:
- square card in white (stamped lightly around the edges)
- 2 Bingo cards by Simple Stories
- metal filigree border coloured silver with Inka Gold in Platinum
- 1m satin ribbon with red presents
- letter stickers

So, even though it's a bit early, maybe I have given you some inspiration for your Christmas cards this year!

GELI

Friday, September 20, 2013

It's Sale Time but only for a short time

To celebrate DSAngel turning 17 on 23rd September we are offering you all 17% off our, already ridiculously low prices!


You must enter "Mark" at checkout to receive your discount.

Sorry but does not include classes, gift vouchers or our Pink Embellishment Kit

Offer ends midnight EST 23rd September 2013


And here is his card I made very quickly for him

Running a C6 Black Twiddleybitz card through my cuttlebug with the Happy Birthday Embossing Folder.

Wiped and Splatted some Picket Fence Distress Stains over my embossing


Cardmaking Birthday Cards


Adhered old chipboard letters and heat embossed "17" with Stampendous Aged Embossing Enamel Scarlet

Cardmaking Birthday Cards

Cut a strip from Tattered Banner Die for "Happy Birthday"

Cardmaking Birthday Cards


and ta da one very quick, no frills (because he doesn't like that kind of stuff) Birthday Card - wish his birth of 10.5pounds had been quick and easy like this card!!!!


Tuesday, September 17, 2013

Time is running out ...

Time is running out to get your preorders in for the September Embellishment Pack - Pretty in Pink.

Only a few kits remaining

All orders must be received by Friday 20th September for 30th September delivery. 

Here is a tease of SOME of the handmade items you will receive in your kit. 


You can order via our website in the my2angels kit section

Friday, September 13, 2013

New Arrivals In Store

One for family, and now - one for those we hold close to our hearts.

For those we cherish...

Introducing the latest addition our hand-made embellishments range of  Charming Words – the "Cherish" Collection. 

Available in a range of colours, each  *cherish*  embellishment cluster combines a bronze filigree with a selection of flowers, a beaded pin, and the word ‘cherish' stamped onto a polymer tag. 

At just $2.50 – you can afford to cherish everyone. 


Available now in the my2angels Charming Words section of the store. Cherish someone you love today.


OMGosh - it's coming.

Winter is coming...

Oops, sorry, wrong blog. :P

As much as we try to avoid thinking about it, the Festive Season is fast approaching. I'm not sure about you, but it seems that the older I get, the shorter the timespan between Christmas's is. Either that, or the post-Xmas hangover is having more of an impact on me than I think it is. :)  Whatever the reason, Christmas is only a few months away and it is the time of year where we need to think about this years' Xmas paper range.

This year, no matter what your scrapping style, Simply Stories has you covered!  Whether you are into the Project Life style of scrapping or simply love layering your die-cuts, December Documented is for you. The collection colours are traditional, but I love the addition of a classic black throughout the patterned papers. If you are like me and have teens, there is always one of them wearing black (say hi DS) on Christmas Day. This makes December Documented a great collection to scrap for his or just the family Xmas albums.

Introducing December Documented ....


Loving the chalkboard look that is so 'in' at the moment. A little ledger pattern here and there, the every popular bingo cards and some stripes. What more could you ask for??

You can view the full collection in the new arrivals section

and ...

Lots of new pretties have arrived to celebrate Spring at my2angels. New colours in our popular small roses and gorgeous magnolias, plus restocks of your favourites. 

To view all our flowers pop over here


Scrapbooking Mulberry Flowers


Wednesday, September 11, 2013

I *heart* Family Embellishments

Looking for the perfect way to show how much your family means to you? 

Have a ‘family’ project you need to embellish? 

Introducing the latest addition our hand-made embellishments ranges - The Charming Words – ‘I *heart* Family’ Collection. 

Available in a range of colours, each ‘I *heart* Family’ embellishment combines a felt heart with a selection of flowers, beaded pin and the word ‘family’ stamped onto a polymer tag. 

At just $2.50 – you can afford to buy one in each colour. 

Available now in the my2angels Charming Words section of the store.


Handmade Scrapbooking Embellishments

Handmade Scrapbooking Embellishments

Handmade Scrapbooking Embellishments

Handmade Scrapbooking Embellishments


Tuesday, September 10, 2013

Double Page layouts for Sale (Premade)

Not enough time in the day for you to get everything done? Need a quick layout as a gift or do you have too many photos from the one event?  Then here is the layout kit just for you with all the hard work already done - all you need to do is add your own photos and title!  Too easy!

Each layout will vary slightly from the one shown, depending on which Kaiser die cuts are used. If you are wanting a more obviously male- or female-themed layout, please advise us in the comments section at checkout.
Please allow a day after paying, for us to create your individual layout.

The left hand side of layout 1 opens up to allow you to adhere various size photos up to 28cm x 13cm. 

FRONT - with photo book closed


The front of the photo book can hold a 10 x 7cm photo - which can be cut into the die-cut as shown.


INSIDE PHOTOBOOK - OPENED UP

The left hand side of layout 1 opens up to allow you to adhere various size photos (mount is 28cm x 13cm)


Your second layout is designed to hold a 6x4" horizontal photo.


Here is a sample of some of the embellishments you may receive on your layout.


The total cost of this pre-made double layout kit is $45.00 (plus postage) and it is available in the my2angels kit section of the store.

Here is another example of one already sold