Monday, November 29, 2010

Christmas Canvas Ideas

Christmas Canvas Ideas

My Christmas Joy

by Wendy


I wanted something to put on my wall as a Christmas decoration so I came up with the idea of making a canvas/layout of my 2 boys using ornament shapes for the photos!

I started off with a 12x12 canvas which I painted with some red acrylic paint and after that was dry I painted on some silver acrylic paint sparingly and then rubbed most of it off just to give a hint of silver.

I made my LO using the gorgeous LYB Christmas Delight Papers, which are so easy to mix and match.

Using the LYB Christmas Morning-Gifts Galore for a base, I have then cut several strips of different papers to use across the middle of the paper, LYB Merry Bright Bands & Chestnut Carols and LYB Delightful Dots.

I have also cut out some gifts from LYB All Wrapped Up for layering with the other gifts across the bottom of the paper. The final strip is some Bazzil Kraft which I punched out using a lattice punch.

After layering the papers and adding the extra cut out gifts (some with 3d tape) I added a strip of my2angels Red Acrylic Chain with Rhinestones and inked up some Scrapware chipboard.

The word ‘JOY’, using the Antique Alphas and 4 Holly Photo Anchors.

After inking, I gave them both a good coat of trusty Crackle Accent.

I also crackled the little bird and the rest of my title which is a diecut and some letter stickers from my stash.

Now the most important part, the photos, are stuck onto chipboard (MDF) ornaments which I had in my stash from last year! (another unfinished project!!!)

After sticking on the photos I cut out around the ornaments with my craft knife and then sanded the edges I am very happy with the finished look. I ‘tied’ them on my LO with some my2angels Gold Satin Ribbon with Gold Stars and stuck the holly on next to the photos with some red ‘berry’ brads!

Finally I used some Kindy Glitz, Perfect Pearls (mixed with some Mod Podge) and Liquid Pearls to decorate my gifts (think all that KG Corrina has been using on her cards has finally rubbed off on me lol!!!).

When my page was dry I stuck it on my painted canvas using double sided tape.

Thanks for looking!

Wendy


From Taryn


I was lucky enough to get my hands on some of the gorgeous Everybody Loves Christmas range by Echo Park, and made a cute little Christmas canvas...


If you want to have a go at making one of these yourself, here's a few tips on how I went about it.
I started by cutting a random-shaped piece of card to fit just inside the edges of the canvas.


I covered it in the Snowmen paper, and added a few green hills, along with some Christmas
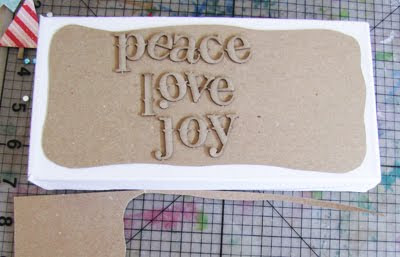
trees I cut from the Trim the Tree paper. I highlighted the edges with some distress ink, and some stitching, and then gave the entire thing in modge podge before mounting it onto my painted canvas using 3d foam tape.


I chose a Christmas tree from the Everybody Loves Christmas sicker sheet, and decorated it using pink rhinestones and a few charms.

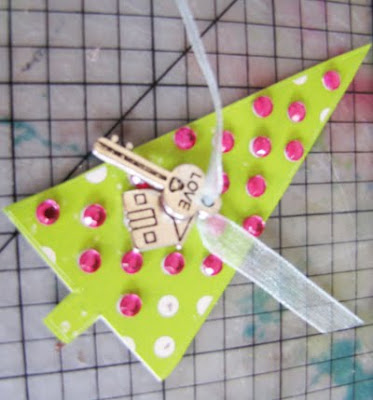
I also chose a scrapware tree, and covered it in Candy Cane paper, inked the edges, and added some blue rhinestones, and a large silver rhinestone on top.

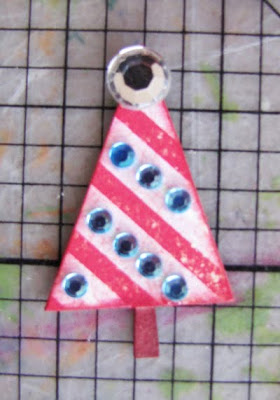
The scrapware houses were covered in patterned paper, and decorated with rhinestone chain, and I also used some scrapware mini grasses.


For the alphas, I used scrapware mini antique alphas, which I inked with distress ink, then followed with a coat of clear embossing powder, and sprinkled on a little silver glitter glass while it was still hot.
Hope you can use a few of these techniques on your next project, and even better still, hope you get to try the Everybody Loves Christmas range.

It is so bright and cheerful, perfect for our summery Christmas

Taryn


And lastly, from me Tracy


I just love the new paper range from The Girls Paperie , nice thick papers ... perfect to tear and distress. And the colours ... are my favourite and match so many of my photos kind of Pink / Raspberry and Green and since my top in this photo was so dominant well ... I had no choice but to use it ah?

This is my favourite photo to date of my angels and I taken back in August which is my Christmas present to myself and now sits on my computer desk. Whoops I mean when I open it up on Christmas morning it will go on my computer desk PML


I covered the canvas with Tinsel & Twig Deck the Halls pattern paper and black inked the edges

The scrapware Chipboard Flourish Arch was painted black then I heat embossed it with Metallic Silver and wiped it off which still hot, exposing some of the black base

Jut behind the flourish piece I cut up a section from the Tinsel & Twig paper - one side of this paper is a patchwork of patterns from the range. I choose the tiny rose blooms patchwork (they are so pretty and dainty)

Each of these papers on the border (you know the piece we usually cut off, has a small section from another contrasting pattern paper, so using the rose blooms piece I mounted this with foam tape to created a window sill

I covered the photo with acetate then adhered to the canvas


As it was around 5ish when creating this - it was wine time so I broke a branch off a tree from out the back, sat down with a wine enjoyed the sunshine and painted the branch black - it doesn't take long ... in fact I only just finished the glass ;)

See ... scrapbooking is a stress reliever LOL it might cost us lots but then so does a medical professional!


Randomly sprinkled with diamond dust (OOOOOOOO it is back in stock yipee) and twisted some of our new Black and White Stemmed Flowers to the branch

Using string I created a trail for the scrapware butterfly which was covered with another piece from the patchwork pp (raspberry dots on beige), diamond dust and black ink with cream stamens


These scrapware butterflies are so handy dandy to have in your stash, you get 14 per sheet in a range of sizes

After sticking the chipboard butterfly down I then attached the branch


Created a border with black lace , 2.4cm cream lace, small black flowers centred with clear black rhinestones
With our eye pins I added deep pink rhinestones and some flower jewellery findings I had

On the window sill I twisted black and white stemmed flowers and hung a made with love charm off them.

Added another handmade pin using our white pearls & spacer beads onto an eye pin
And lastly to finish off ... a butterfly charm

We hope we have given you some ideas of using canvas for your next OTP.
They are really cheap, I got mine from Crazy Clarks for around $2.50.

I am in the middle of this years Christmas OTP using a much larger canvas with some Scrapware Houses ... yes the house obsession continues LOL


Saturday, November 27, 2010

Christmas Layouts and Embellishments

Wendy's First Christmas layout of the season

Well it is almost upon us for another year, so this month we are showcasing Christmas and I love Chrissy LO’s so I’m hoping my scrapping ‘spirit’ will return this month!!

This is my DS sat under our Christmas Tree for the usual obligatory photo I take each year on Christmas Eve!


For this, I have used some of my absolute favourite papers, which Tracy was kind enough to get in for us.

I have always loved Basic Grey papers, I could always spot them a mile off in the LSS, and this Jovial range is so gorgeous.

All the papers match and coordinate so well that it is so easy to mix and match and the leftover bits are just perfect for your Christmas cards.

I’ve used the Pomegrante as my base and then cut up the Frosted Window and Merry Maker into some strips and used both sides of the paper.

I also pleated up one piece and added some red satin ribbon with white swirls.

The tree is from my stash but the Scapware fern tree or circle tree could be used instead. I gave the tree a combination of treatments, starting with some perfect pearls in Kiwi and Rust (for the ‘baubles’) and then sprayed puddles of Glimmer Mist in Honeydew and Starfish onto some paper and then applied it to the tree with a paint brush.

Finally, I added some Diamond Dust on some of the leaves.

I also used the same treatment (inking first though) to the Scrapware Holly Photo Anchors.

The flower I cut from the BG Nordic paper and ‘painted’ with Glimmer Mist and the centre has been highlighted with black and white enamels.

My title is a combination of Thickers Daiquiri, Jenni Bowlin Circle Alphas in Reverse Black and Reverse Red and some Rusty Pickle Alphas which are unfortunately no longer in stock. The Chocolate Kisses that Corrina used on her ‘Friends’ page though are the same font and can still be found in the shop if you are quick!

The journaling circle is from the LYB Christmas Delight Journal Tablet and I’ve also added a my2angels cross charm next to my title. Phew I think thats all!! Thanks for looking!


And from me Tracy

I usually have to create 2 layouts one for each of the angels albums if it is an occasion that they are both in the photos so I have finally made a start on last years Christmas layouts (we won't mention where the previous Christmas layouts are!).
Funny ah? Christmas only comes once a year (thank goodness sometimes) but I just never seem to get around to doing the layouts!

So for DS photo album he has this layout using Basic Grey Jovial


And a more feminine layout for DD's album using the gorgeous The Girls Paperie


If you would like step by step instructions to create these layout you can find them here in our Christmas layouts in the Christmas Resource Section

In early December I will be sharing 8 days of Christmas Embellishments while trying to use 3 products or less.

I have already used one of these on the layouts so whoops LOL in advance here is one of 8 :) Perhaps I will have time to come up with another one to replace this :)


Christmas Embellishments Baubles


For the left bauble
Coat your circle pendant with dimensional magic
Add red rhinestones
Top with red and green inked scrapware mini holly
To finish them off tie with silver twist chain

The other two baubles use pattern paper to coordinate with your layout and finished off with
red organza ribbon or red rhinestone acrylic chain

OR

Coat your circle pendant with dimensional magic and covered with Glitter or Diamond Dust
Add a metal textured star
Finish off by “hanging” rhinestones


Hope you like :)


Thursday, November 25, 2010

Introducing the newest members to the my2angels Design team


It gives me great pleasure to announce the following talented ladies joining us on the my2angels Design Team for 2011


Lindy Gillespie


http://wwwjustanotherday.blogspot.com/


Geli Duncan


http://colourblast.blogspot.com/

and joining us part time (for the moment) are ...

Lisa Webb


http://intheeyesofmoonie.blogspot.com/

and

Jess Mackenzie


http://thehappyscrappyplace.blogspot.com/


Pop over to their blogs and see what you can expect from them when they starting creating for us in January 2011

PS Yes I know we advertised for 1-2 new members but the talent and applications made the decision too hard to narrow down to just 1-2

December is the last month with our Taryn, who has decided to go back to work "out of the home"

We wish her all the best with her new adventure and a huge thanks for all the wonderful creations she has done for us this year and for "putting up with me" LOL
MWAH

Hope everyone is having a wonderful week


Saturday, November 20, 2010

Christmas Cards Day 12 Felt Christmas Tree

Christmas Felt Tree
by Corrina


Materials Used:

Papers – Little Yellow Bicycle Christmas Delight/Merry Mint Brocade and Tis the Season Stripe, white cardstock folded into a 6 inch by 6 inch square card.

Embellishments – My 2 Angels Large Silver Snowflake Charms, My 2 Angels Double Star Charms, silver rhinestones, thin white organza ribbon, white acrylic chain with rhinestones, White Stars and Scrolls Felt Ribbon, a piece of scrap clear acetate sheeting (like from a chocolate or gift box).

Product Used: Crystallina Kindyglitz, Twinklets Diamond Dust, PVA glue, 3-D foam mounting tape, Martha Stewart Deep Edge Punch.

1. On a scrap piece of paper, draw a triangle shape Christmas Tree approx 10-12cm tall. Lay the scrap piece of acetate over the top.

2. From the felt scroll ribbon, pick out the star for the top of your tree and cut your approximate triangle shape, being careful to follow along the lines of the scroll pattern. Any missing pieces of your triangle can be filled with cut offs. Lay this on your acetate and adjust until you are happy, then peel the backing paper off and stick down.

4. Using scissors, cut around the edge of the tree shape, following the pattern, so you cannot see any acetate edges.

5. Using a soft paintbrush, paint a thin layer of Kindyglitz in the pattern spaces. Sprinkle a small amount of diamond dust over this and set aside to dry.

6. Using the paintbrush, paint a thin layer of Kindyglitz along the side opening edge of the card. Set aside to dry. While the card is drying, cut a piece of the LYB Merry Mint Brocade to fit the face of the card. Punch along the edge with your edging punch. When card is dry, stick the punched edge paper to the front of the card.

7. Cut a piece of the LYB Tis the Season paper 11cm x 14cm approx. Adhere to front of card, then using PVA glue and a toothpick, frame the edge with the white acrylic rhinestone chain.

8. Once the Christmas Tree is dry (YES Tracy, it has to be DRY LOL!!!) shake off excess diamond dust and stick to front of card using 3-d mounting tape (hide it behind the stars). Make a trunk out of leftover scroll scraps and adhere them flat to the card, then cover the join with an organza ribbon bow. Decorate your tree with snowflake charms, a large double star charm and rhinestones.


Taa da finish:)


We hope you have enjoyed Corrina's 12 Christmas Cards and perhaps given you ideas of getting your mojo into action to make a start cause as that damm sign outside the entrance of Toyworld, that pass everyday .... it is only 6 weeks till Christmas!!! ARRRHHHHHH

For all of Corrina's cards in the one place you can find them here in our new Christmas Resource section - not all the sections are linked up yet well we can't show you everything just yet can we? LOL But the DT and I have been busy!

PS Diamond Dust will be back in stock before end of November

Hope you have a safe and creative weekend


Friday, November 19, 2010

Day 11 Christmas Cards Traditional Poinsettia Card


Christmas Traditions Poinsettia Card
By Corrina


Materials Used:

Papers – Little Yellow Bicycle Christmas Delight Merry & Bright Bands paper, red coredinations cardstock made into a 6inch square card.

Embellishments: Little Yellow Bicycle Christmas Delight Journal Tablet, My 2 Angels Poinsettia Mulberry Flowers, Gold Acrylic Flower Chain With Rhinestones

Products used: PVA glue

1. Cut the presents strip from the LYB Bright Bands paper. Stick along the front of the card approx 2/3rd down the card.

2. Using PVA glue, adhere the gold acrylic flower chain along the bottom of the present paper strip.

3. Attach the A Special Gift journal tablet onto the top ½ of the card. Glue the poinsettias into position so the greeting can be read.

4. Cut the Christmas traditions heading off one of the LYB journaling diecuts (the red and cream one), and attach just below the poinsettias but above the gold acrylic chain.

Finish the card off by cutting a thin decorative strip from the LYB Bright Bands paper and stick along the top and bottom edge of the card.


The Poinsettias are currently in transit and we expect them to arrive before 1st December (touch wood!) They are a new set and packaged in organza bags - make a nice stocking filler for a scrapping buddy or yourself :)