Thursday, October 30, 2014

"Vintage Garden" Layout Kits available

With Spring in full bloom we couldn’t miss the chance to work with the gorgeous ‘Vintage Rose’ range from Couture Creations. Up for sale are two lovely, shabby chic or vintage style layout kits using this range, focusing on spring greens, blush pinks and vintage sepias. 

For those of you who missed out on purchasing the paper pads or who were not wanting to buy the whole range – this is the perfect chance to play with some of these stunning papers.

Each ‘Vintage Garden’ Kit contains a selection of embossed and patterned paper which you can distress, ink and layer to your hearts content. Some of the papers are also perfect for a little fussy cutting – so there’s something for everyone. In addition, we have carefully selected an assortment of filigrees, charms, roses and pearl garlands to compliment the papers.

Create your own layout or follow the included instructions to produce the layout shown.

Cost is $18 for each Kit, with postage for one or both kits at $7.20. To purchase your kit click here to go to the store website.


Monday, October 27, 2014

The Christmas Workshop Trifecta

HO HO HO, Baublemania and a White Christmas

my2angels has some scrappy Xmas fun for you all - not one, not two, but three wonderful classes for Christmas.  First up is our Baublacious Workshop.

Haven't you always wanted to spend all day making baubles of various types for your scrapbooking layouts/cards? And of course the only thing that would make you happier is our special (and very) adorable OTP bauble.  Well wait no longer - as this class is just what you need.
We will be using a variety of product to make our wonderful baubles - including (but not limited to) shrink film, clay, fabrics and ribbons, beads, diamond dust, bottle caps, inka gold, embossing and more...

Your OTP Bauble (shown here in pink and vintage brown) can be made in your choice of colour.  PLEASE ADVISE at time of booking what your choice of colour is (we will do our best to ensure that we are able to supply the materials for your choice of colour).


Christmas music will be droning on, (I mean) merrily playing in the background, the my2angels shop will be there and we can promise you lots of crazy fun.
Only $10 deposit to secure your seat - and don't forget to wear your special Chrissy t-shirt to get you in the mood for bauble making. 
Tea and coffee will be available and afternoon tea is supplied.
 \

Here is a sneak peak of a few of the baubles we will be making on the day.


Where:  For a change, Shelley's Land ( at Acadia Ridge) will be hosting this event for my2angels, allowing our ladies further north to travel a little less for this class. 
When:  30th November 2014 - starting at 10am until approximately 4pm
Cost:  $35.00

What to bring:

Plate for lunch to share
Your basic tool kit plus adhesives
(including Glossy Accents or Dimensional Magic for top gloss coat)
Tweezers
(special Xmas T-shirt)  ;)

The following are optional and will allow for spares and sharing:
Acrylic Stamp Block
Hot Glue Gun
Heat Gun
Blazing Red Stazon or your colour of choice to go with gold or silver (BUT IT MUST BE STAZON) 

You might want to add in a bottle or two of sparkly wine baubles - because this class is just going to be full of Xmas cheer.

And in the tradition of Christmas's past...

we at my2angels - once again announce our annual 

Christmas OTP class - 'Dashing through the Snow'.

Every year, this class produces an amazing heirloom quality Christmas decoration.
Every year, this class books out (so get in quick and don't be disappointed) and,
 every year, Ngaire comes and never manages to finish her OTP.

So this year - 2014 - make it the year YOU come to this class, because we have something special for you (yup - Tracy has outdone herself) - this stunning, snowy, present-laden sleigh. There are the required jingle bells, mistletoe and holly, some sparkly bits and lots and lots of messy fun to be had.


2014 my2angels Christmas OTP
"Dashing through the Snow"


This year there are two class times to choose from and two locations:


23rd November at my2angels (11am - 4pm - Afternoon tea included in price)

5th December at TJ's Scrappin in Style (6.30pm till late - Supper included in price)
So come spend the day with my2angels creating your very own family heirloom.

The sleigh is made from MDF and to this we will add texture and glimmer, create beaded twigs (lol), a santa sack of presents, poinsettias, beaded baubles and the sleigh even has its own number plate.  And for a magical final touch  the sleigh has LIGHTS (battery operated) to show Santa the way (no more relying on Rudolph and his red nose, Santa has moved into the 21st century).

Cost: $59.99 (A deposit of $20 is required to secure your spot. This is non refundable, unless a replacement for you can be found.)

What to bring: 
Basic tool kit with adhesives(hot glue gun optional but will allow for spares and sharing)
Acrylic White Paint, Medium Sized Foam paintbrush and a small paintbrush
Baby Wipes 
Damask template or something similar (Kaisercraft template is what I used) this will allow for spares and sharing)
Plate to share for lunch, afternoon tea is supplied in price and there is an endless supply of coffee and tea (please bring own cold drinks if preferred).


Dreaming of a 'White Christmas' ...

After all those white and silver sparkles (plus the recent heat wave), Tracy got all misty-eyed reminiscing about white Christmas's from long ago. Several hours, a few pots of glitter and the odd wine later - the 'White Christmas" Card class was all done and dusted.


So come join us at my2angels and create 6 classically elegant

'Silver and White' Christmas Cards.


Class cost is $30.00 and includes afternoon tea and an endless supply of coffee and tea
(please bring own cold drinks if preferred).
Just bring your basic tool kit with adhesives and plenty of Christmas Cheer.


22nd November 1pm - 4.30pm (afternoon tea supplied) OR

25th November 11am - 2.30 (BYO lunch)


To secure your spot in our classes, please over pop to our website here.


Sunday, October 26, 2014

Grunge Time Charming Frame - the boys' version!


You've seen the pretty, girly version of the Grunge Time Charming Frame kit (see the finished sample here) and here is a version for the boys! 


Same kit, different theme. At $3.50 they're a steal.
I spray painted my clock piece with some stone effect spray paint, but you could use a different medium like Ferro or Distress Embossing Enamel) to get a similar effect:


Next, glue the frame on a piece of acetate with Glossy Accents or Dimensional Magic and adhere a die-cut round photo behind that:


Fill in the spaces between the Roman numerals with Crackle Medium or Distress Crackle Paint to get some cool cracks in your "glass":


Place the acrylic block on some cool paper, trace around it and cut it out. Shade the edges with Distress Ink and glue it to the acrylic block with Glossy Accents or Dimensional Magic:


To give the chipboard cogs a cool grungy look, heat emboss them in several layers of embossing powders and while still hot, sprinkle on some Micro Beads. Then add one more layer of embossing powder on top and heat one more time. You can also try embedding some Mica Fragments:


Now use a hot glue gun to glue your clock frame into the block's slit and glue down the embossed chipboard and metal cogs:


Gather some boyish embellishments to finish the look. I used:
- the "game over" tile from the Boys to Men Charming Button Collection


- all the metal cog charms from the kit
- a few ball chains
 - more micro beads
- some star sequins (to hide any hot glue mess)


 - a bottle cap embellishment from the Grunge Charming Dates set


Did you know you can get rid of those pesky stringy bits from the hot glue by pointing your heat gun at them for a few seconds? They will melt away! Just don't do it long enough to melt anything else.

As you can see, this frame is most versatile. Just compare the 2 versions and create your own favourite look!


Saturday, October 25, 2014

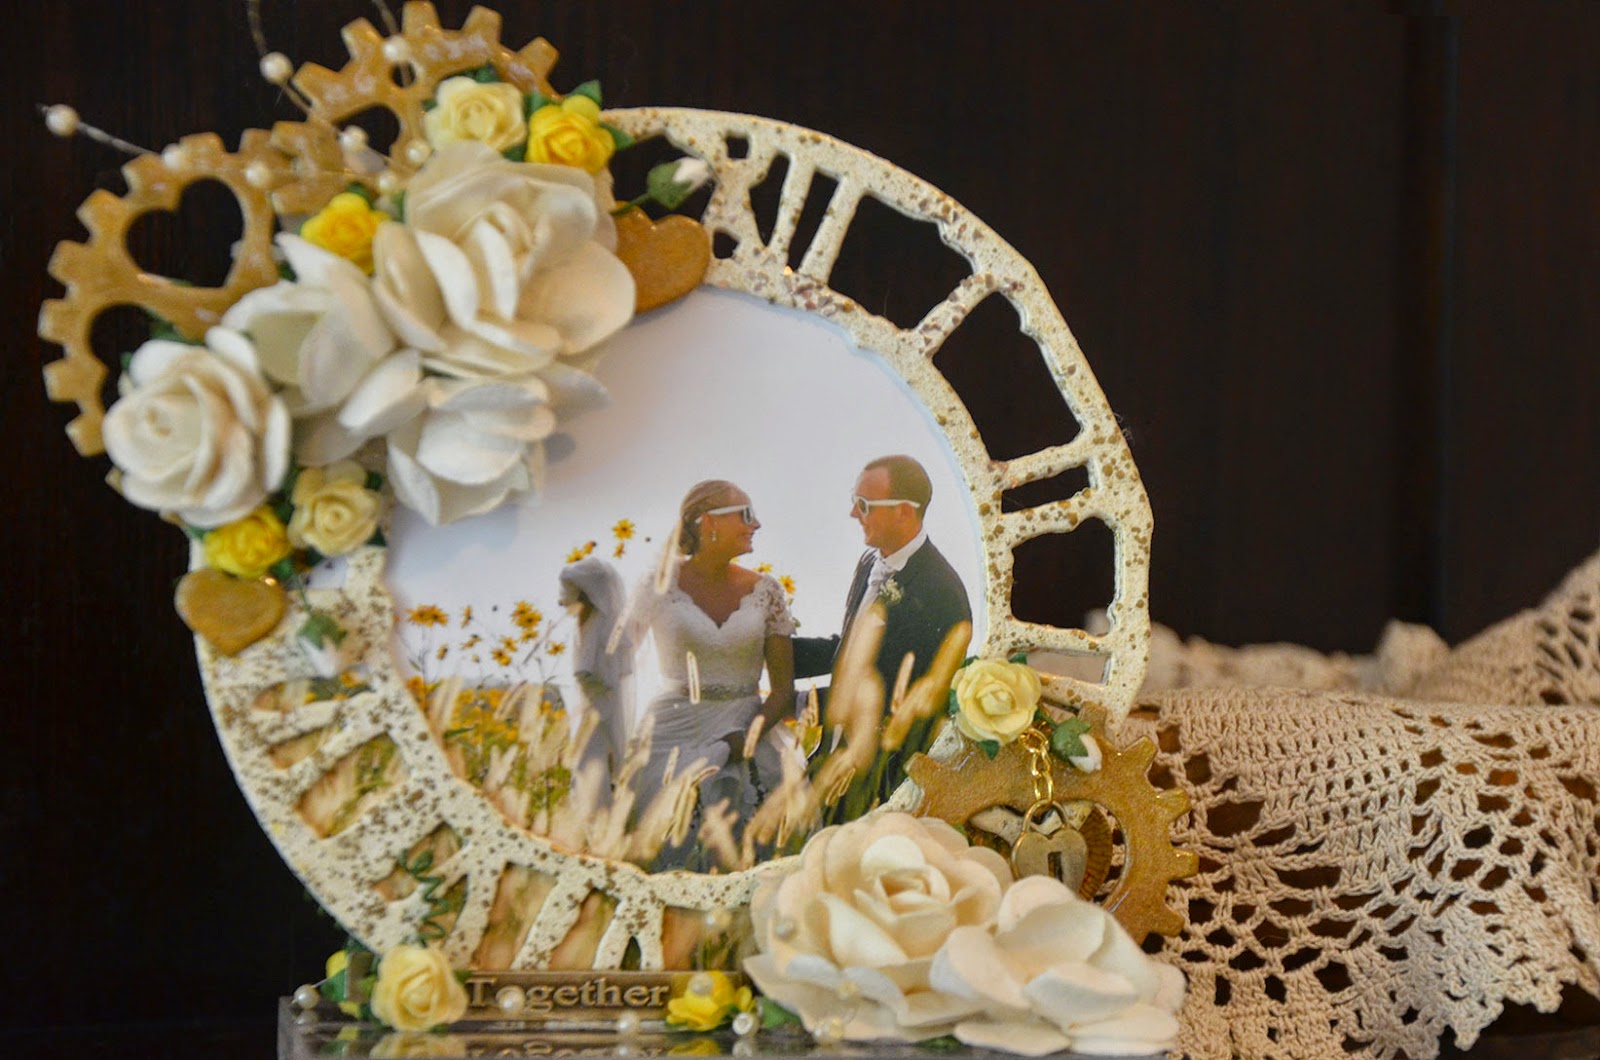
Introducing Grunge Time Charming Frame Kit

I love grunge - it's totally awesome....but some days I love Shabby Chic just a little bit more ;)

The Grunge Time Charming Frame Kit lends itself to any style really...so I chose to make it pretty this time.

With the ''Wedding of the Year'' now over, I find myself with millions of photos to scrap, but I know that it will take me ages to make that happen! Getting one or two out on display fast is a priority, and this little frame kit is perfect for the job. 
Because there are two sides you get to use two photos...Side 1


...and Side 2


The first step for me was covering all the chipboard with white Gesso (acrylic paint will do the job just as well) just so that no brown bits would show through. Then I used Ivory Stampendous Aged Embossing Enamel to cover both sides of each clock die-cut. 
The chipboard cogs, and the hearts that form the holes in them, were all coated (on both sides again) with Tarnished Brass Metallic Distress Stain followed by a coat of Glossy Accents. This gave them a shiny dimensional look...very pretty.

When I put my photos behind the clock 'frames' I decided to cut out the unembellished top edge - it gives the frame a lighter, more delicate look. 

Besides using three of the four included chipboard cogs, and several of the little cut-out hearts, I used two Tag Charms - 'Together' and 'Forever', and a Bronze Heart Locket on a small piece of  Gold Iron Chain. These were brightened up a little bit first with a rub of Brasso.


But...again because there are two sides, you need to make sure you hide the ugly, glued back side of your embellishments. Flowers are the perfect disguisers.

The flowers I used are Large White Roses, White Cherry Blossoms,  Creamy Yellow, Yellow, and Cream 1cm Roses, and some tiny white rose buds. Finally there are a few pieces of Ivory Pearl Garland adding delicacy to the finished look.


All glued into the clear acrylic base - also decorated with roses - it's a lovely addition to any sideboard....simple to make and so pretty. 


Friday, October 24, 2014

Introducing ... Charming Frame Kits

This week, my2angels is introducing a new "Charming ..." range AND a new DT ...

So to start the week - we have Susan and "Rustic Spring".

Introducing our Newest Design Team Member

Susan Martin


Hi, I am Susan,
and I have been interested in all types of arts and crafts since I was a small child. I progressed from making potato and lino-cut prints at primary school to water colours, acrylics and jewellery making, before settling on paper crafts. I have taught folk art and jewellery making and presently teach card making, off-the-page and mixed media projects.


Charming Frame Kits


Introducing "Rustic Spring" - the first in our range of "Charming Frame Kits". Each Frame Kit comes with an acrylic block, Transparency and 2 chipboard frames (so you can have a photo on both sides); as well as an assortment of charms and chipboard shapes.  Each kit costs only $3.50.

In "Rustic Spring," you have an assortment of chipboard flowers and branchlets, as well as some stunning charms. You can glam it up, keep it simple or go shabby chic - whatever suits your own décor.


In "Grunge Time," your frame is a stunning chipboard clock face, which you can adorn with a selection of metal and chipboard cogs. Although 'getting your grunge on' would make for a great frame, the clock/cog elements also lend themselves to a vintage look or even shabby chic (check out the heart shapes in those cogs).


"Picture Perfect" contains a stunning chipboard window fame, as well as a selection of metal and chipboard floral elements. A rustic look or even shabby chic would be a great approach to using this Kit.


We gave Susan "Rustic Spring" to play with and don't you just love what she has done with it?


Here is my first project for the my2angels Design Team.  Below is an example of how you can transform the new my2angels Charming Frame Kit (Rustic Spring) into a finished project.  


Here are a few tips to assist you in customising the colour of your Kit items so that they better suit your needs:

Colour Acrylic Frame Base
·           You can colour the acrylic frame base any colour you wish, however, for glue or paint to adhere, you MUST lightly sand it first.
·            You can paint the base with a couple of light coats of spray paint or a couple of coats of gesso and then finish off with acrylic paint.  You could also use textured paints or other mediums.  Alternatively, you could cover with patterned paper or cardstock.

Colour Frame and Leaves
·             The frames and leaves are raw chipboard; therefore you can paint or ink any colour you wish.

Colour Paper Flowers
·             The flowers in the kit are white, so you can easily change them to a colour that suits your project.  You can use Tim Holtz Distress Inks as I have, or you can colour with dyes, Perfect Pearls/Glimmer Mists; or make your own medium using Perfect Pearls Powders and water.
·             To colour using Tim Holtz Distress Inks:

Swipe the ink pad onto an acrylic stamp block.

Add a couple of drops of water.  The more water, the more subtle the colour.


Using an Aqua Brush or small paint brush (wet with water), paint the watery ink onto the flower.


Colour Felt Hearts
·         The felt hearts are pink, but don’t worry if they are not the correct shade or colour for your project – you can change it.  I made the colour more subtle by using Perfect Pearls Powder to change one heart and by adhering embossed pale pink cardstock to the other.
·               You can totally change the colour by painting the felt heart with acrylic paint or by applying any of a wide range of mediums.  Just remember that because the felt is very absorbent, you will need to repeat several times, allowing that heart to fully dry between each application.
·               To change the shade by using Perfect Pearls Powder:

Push the felt hearts into the VersaMark Watermark Stamp Pad OR cover with Ranger Clear Perfect Pen.

Using a DRY paint brush, generously dust on Perfect Pearls Powder – Perfect Pearl.


Colour Silver Flower Wrap Filigree
·         You can change the look of filigree pieces by painting them.  I spray painted this one.  You can, however, also lightly sand and then paint with gesso and acrylic paint as well.


I really had a wonderful time playing with this Kit - I can just see them making a great present for Christmas or a Christmas holiday project with one of the kids. You might want to get in quick though, as Tracy only has a limited number of each of them.


Friday, October 10, 2014

Remember the Moments

Hi everybody!! 

Well, we made it back safely from the Wedding of the Year in Italy and I'm slowly getting back into my routine. The cat has (almost) forgiven me for deserting him and my scrapping desk is calling.

I know, Tracy...it really IS about time!! I can't apologise enough and you have been more than patient. An angel in fact ;) 

On Sunday we finally met our very first Grandson....and he's SUCH a cutie. DH's son has been working overseas for ages and this little man was born in America. They came home for good the day before DH and I took off for Italy, so last weekend was the first opportunity for a face-to-face cuddle. I'm going to love scrapping his gorgeous face, he's so full of smiles and sunshine, and only just three months old.

Scrapbooking Baby Layouts


For this layout I've used Illumination papers & elements by 7 Dots Studio. A sheet of the reverse of Joy on a piece of black cardstock - the cardstock only for added strength.

To that I've added some Gloss Multi Medium pushed through the Twiddleybitz Narrow Arrow Template which adds texture and a bit of shine without complicating the pattern already on the paper.
For finer detail, and to introduce some colour to the background, I used light blue acrylic paint with a Basically Essential template - also in the chevron pattern - and the checkerboard background stamp from Illuminations Clear Stamp Set 1 with various black, white and blue inks. There are also a few random pieces of sticky white plasterer's mesh.

I mounted the photo on three layers of paper - Tolerance, then the reverse of Acceptance, then Diversity. The same papers were cut into thinner strips, punched using a scalloped edge punch and added to the bottom. The three tags on the layout are from the Illumination 12 x 12 Die Cut Tags sheet. All the layers are inked just a little bit using Broken China Distress Ink and an Ink Blending Tool.

Scrapbooking Baby Layouts

To the embellishing.... from the Illuminations Chipboard pack I chose the 'Remember' and 'Moments' tags and the checkerboard border. I painted them with the light blue acrylic paint. The '3', small heart and arrow (bottom left) are from the Illuminations Stickers and making them look prettier are two Glass Cabochons. The heart is popped up on a square of dimensional tape. The skeleton leaves are die cut from Diversity.

Scrapbooking Baby Layouts

Between the two tags there is a length of  Ball and Chain - attached through two Silver Jumprings, but also with a dab or two of Glossy Accents on each end for added stability. Looking very cute dangling from the chain on more Silver Jumprings are four silver charms - ABC BlockBaby FeetTeddy Bear and LOVE. They look so awesome!!

Scrapbooking Baby Layouts

Tucked in with the skeleton leaves is a my2angels Charming Pin. This one's colour is Pewter, and I have changed the flower charm that was on the top to another ABC Block to match my theme.

Scrapbooking Baby Layouts

Making the top corner of the photo beautiful...besides that cute smile... is an embellishment made with the gorgeous my2angels Mini Sweetheart Baby Blue kit. This time I stuck to the correct colour and only added Inkssentials Crackle Accents to the heart section and a few Crushed Ice Sugar Beads to the centre to lighten up the included Blue Lemonade ones
.
Scrapbooking Baby Layouts

At the bottom adding balance is the third tag, with the addition of a small glass bottle filled with Sugar Beads,  Crushed Ice again mixed in with some of the remaining Blue Lemonade from the Mini Sweetheart Baby Blue kit. There are a very generous number of beads included with this kit - plenty for any additional embellishing you may need to do.

Scrapbooking Baby Layouts

I didn't want to add any more clutter to this layout, but felt like it needed something more. My solution was to cut out several of the chevrons from Tolerance and the reverse of Joy, ink their edges with Broken China Distress Ink and pop them onto dimensional squares directly over the top of the chevrons already on the paper. This added another element, but didn't clutter up the layout. I like it :)

Back soon!! 

Scrapbooking Baby Layouts

Tuesday, October 7, 2014

"Grunge" Photo Wreath

My Circle of Grunge

Yeah, I know - I can only do sweet and pretty for so long, before I feel the need to grunge something up. So here is my grungy version of the 'Photo Frame Wreath".
I started off with a wreath, and covered it all over with our white butterfly felt ribbon. Then it was given a coat of Ranger 'multi medium matte' to give the felt and wreath a protective coating and to provide a surface that will hold any art mediums eg spray, paints etc.


Next I painted it with Kaisercraft 'pistachio', 'black' and 'gold' paint and embellished with layers of flowers, chipboard and charms (all relating to my theme of "Time Flies" - how quickly the Angels have grown up).  I picked embellishments that had different - but complimentary tones - so that after all the mists and other mediums are added they would give me a range of matching shades.


Once everything is dry, it's time to hit it with splotches of 'Apple' Glimmer Mist (love the gold base in this spray) and my homemade 'Vintage Photo' Glimmer Mist in random areas.  For a little extra 'grunge' I also added  a little black ink here and there.


Grabbing some acetate, I randomly stamped with a cog stamp and Stazon 'jet black' (this is the only ink that I am aware of that adheres to acetate) and added a few chipboard cogs and cog charms.
 To add interest behind my clock and photos, I adhered some cogs to the middle of the wreath as well.

I had an old drawer handle lying around - so I glued it into the top of the wreath and attached a bronze chain and some love charms.


My clock chipboard I painted with Kaisercraft 'pistachio' and black ink.  After painting and inking a few chipboard cogs, I popped the onto the clock face with my photos and attached to wreath (with jump rings) onto the border filigree to hold it secure.


To get that gorgeously grungy look to my chipboard angels wings - I started with a spray of water then I scrunched them up; and finally I painted them in gold, before applying a clear crackle paint layer with an overlying swipe or two of black ink.


Over the top of the angel wings I placed a small chipboard clock that was firstly painted green, before being embossed with Stampendous Black Embossing Powder. I've then wrapped some bronze chain around it, added a clock and heart charm and then adhered it to the wings over some black mulberry flowers.

The final step was to apply some 'Mint Green' and 'Brown' Inka Gold to highlight random areas on wreath.