Wednesday, May 27, 2015

The Colours of Tuscany

You will all know that my beautiful daughter was married to the man of her dreams in Tuscany last September....they have featured in a couple of my projects since then, and I have found that while the colour of the wedding was blue, the muted colours of the Tuscan landscape also suit my projects to perfection.


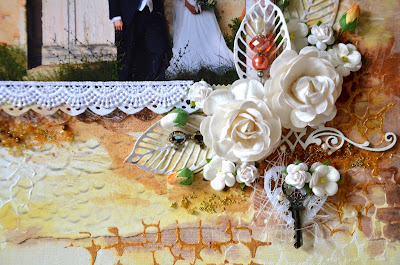
The one I have just finished focuses on the warm terracotta and cream of the beautiful old buildings that dot the landscape - and a photo I just love.


I jumped out of my usual comfort zone for this one and started with a 12x12 piece of chipboard covered with a sheet of sticky-backed canvas. I layered on a few torn pieces of patterned paper (from 7 Dots Studio's Domestic Goddess range), sticking it down without worrying too much about the edges, and painted it all over with white gesso. When it had dried I pulled out a stencil and added random patterns all over - first with Gesso again, and then with Viva Decor Ferro Metal Effect textured paint. I used Gold.

Again, after it had dried thoroughly, I wet the page again where I wanted to add colour - I didn't spray - I used a paintbrush with yellow Jingle Bells and brown Suede Glimmermists. The colours run beautifully, and I prefer the control you get with a brush. I've never been a great sprayer!

My photo is mounted on two pieces of the same paper I used on the background - one sheet was enough for the whole layout. Then to add depth I used Dimensional Tape to stick it to the background.

There are also three layered strips of lace - 2 die-cut paper, and one fabric


Embellishing is easy with my2angels products and a few pieces of chipboard. I have used a lot of flowers - Large White RosesWhite Sweetheart BlossomsWhite 1cm RosesWhite 7mm RosebudsTangerine 1cm Roses, Tangerine 7mm Rosebuds and some tiny White 3mm Rosebuds.
Several Die Cut leaves fill out the clusters and I have also added a small bronze pair of glasses from Tracy's HUGE collection of Charms and a pretty Charming Pin.


Right down in the bottom corner is a beautiful hand made felt heart & key embellishment from the Antique Wings & Things kit and I finished the layout off with a scattering of Gold Micro Beads and Golden Crunch Sugar Beads in several places. These I stuck on with a combination of Ranger Matt Gel Medium and Glossy Accents, so they're really not going to fall off :)



Wednesday, May 20, 2015

A couple of little things after a long break

Hi everyone! At last I have come out from under my rock, tidied up my scrapping space and started creating again! I must say I needed the break though - work got hectic, life got in the way and I just couldn't think!

I started in a small way - first with some ATC's for a swap group I've been involved in for several years, and secondly with a mixed media embellishment experiment that I've been wanting to try.

First the ATC's.

The criteria for this swap are different every time, but are open to any interpretation you want - the sky's the limit. This time it was ''Fibre and Feathers'' and this is my slightly tropical contribution.


Artist Trading Cards

There are a whole lot of my2angels products here....first the ATC base itself - these ones are Inkssentials Kraft - with a simple gold heat embossed border. I used a swipe from my Emboss It Dabber and then dipped the wet edge of the card into some Zing Metallic Gold embossing powder (sadly out of stock right now, but I need some more soon, so I guess maybe Tracy will get some in ...please when the exchange rate gets better).

After adding a slightly smaller piece of background paper and stamping with a palm frond and Peeled Paint Distress Ink, I added a bit of something sandy with Ferro Metal Effect Texture Paint (gold again) pushed through a stencil and a scattering of Golden Crunch Sugar Beads.

The first of my ''fibres'' was the curly frayed bits you can pull off the edge of an old white elastic bandage...NEVER throw these things away LOL! 

Artist Trading Cards

The embellishment on top is made up of a few simple elements. A Mulberry Flower painted gold using metallic acrylic paint, a Frangapani Flower (slightly cut down to fit better on the card, a piece of raffia - tied and frayed - the second ''fibre'' I used - a small Green Mulbery flower and my nod to the ''feathers'', a silver Parrot on a Flower Swing charm. After I'd finished painting the gold flowers I watered down the remaining paint on my palette and flicked some gold spots around on the bottom of the card.

I hope the ladies in the swap will like them :)


After making these cards and sending them on their way in the post I sat down at the still tidy desk (!!!!) and had a play with altering some leaves. 

I used two Large Green Leaves with Cream Edges, several White Mulberry Paper leaves and a piece of an old Prima Vine that was hanging around in the bottom of my Flowers box. Later I added a metal flower made up of several Filigrees...available here.

First paint all the leaves with a base colour - I used blue. Don't forget the stems.

Artist Trading Cards

Add a very thick coat of Clear Crackle, some Blue Lemonade Sugar Beads and a scattering of Micro Beads - mine are Silver and Multi-Coloured.

Artist Trading Cards

Put more crackle over the beads and wait AGES for it to dry :)

Artist Trading Cards

Add a bit more crackle or beads if you like....wait AGES for it to dry.....again 

Artist Trading Cards

Use a dry brush and some metallic paint to highlight the edges and the cracks. Did you know that if you mix Inca Gold with a little bit of water you can thin it out a bit and use it just like a paint? As well as ordinary metallic acrylic paints I used various colours of Inca Gold - the bright Gold one on the leaves and also the Turquoise, Cobalt BlueSteel Blue, and Aquamarine on the flower.  my2angels do have Kaisercraft Metallic Gold paint in stock which will work as well.  When the Aussie $ is more in line with the US$ Tracy will be doing a huge restock of products at the moment it just isn't worth her ordering anything as she will lose so much $$$


Here's how it all came out. I think they turned out to be really pretty and will definitely use them on a layout or card in the future.

Artist Trading Cards


Artist Trading Cards

Monday, May 11, 2015

Introducing the new 'Die Cut Angels' range - layout Kits with a FREE die

Autumn nights - mean hot meals, hot cocoa, warm blankets and plenty of time indoors to spend on scrapbooking and crafting. I don't know about you ladies, but I love Autumn. The weather mostly consists of warm (not too hot, not too cold - just right) days and cooler nights. I bundle myself into some uggies and a comfy jumper and hide away in my crafting spot to spend a few hours. What about you? Are you an Autumn fan? 

And to welcome in this cooler weather, my2angels has the perfect crafty solution for your autumn nights ...

my2angels, in conjunction with Shelley's Land (facebook page here), presents to you a series of Kits with a FREE die in each kit.

The new 'Die Cut Angels' range of layout kits means that all you need to do is supply the time, photo, adhesives and inks (optional) - everything else is done and cut for you.

Instructions are not included, however, the up-close detail photos provided are enough for you to complete the page. The Kits are pretty much self explanatory with the photos there to assist you.

Kits vary in price and are available from www.my2angels.net. Look for them in the kit section here. (Please note that postage will depend on how many kits you order, but Australia Post prices start at $7.45 for parcels.)

If your MOJO has gone AWOL, use the kits as a mojo boost - just grab a kit and reproduce the layouts using your stash.

Smile Layout
$25.00

A shabby chic layout using neutal tones - coral, brown tones and a touch of black.
Includes the title "Smile" and a pretty floral flourish die.

Scrapbooking Layout Kits


Shabby Banner
$25.00

The newly released 'Hearts Ease' paper Collection is the feature of this layout. With soft creams, browns and mauve, the layout is a shabby style that suits many different photos.
Includes a lovely flourish die.
(sewing is optional)


Scrapbooking Layout Kits

Memory
$17.99

Create your Memory layout using Fabscraps Papers with a pastel blue and brown theme. Included is an embossed die cut to hang the birdcage and charm from.The texture background of paste and mist will be completed for you.  Memory title is also supplied.
Check out the gorgeous flourish die included.

Scrapbooking Layout Kits


Cheers
$25.00
 This grungy layout will show you how to use bits and pieces from the one sheet of patterned paper (it's a Halloween themed paper, but you wouldn't know it!). 
Texture background of paste and mist will be completed for you.  Title is not included
Checkout that stunning flourish corner die - also included.


Scrapbooking Layout Kits


Mates
$25.00

Grungy masculine layout with a stamped, texture background. See how to make the most of paper strips.Texture background of paste and mist will be completed for you. 
Scroll die included in Kit.


XOX
$25.00

A floral fantasy in yellow tones, this layout is for the girly girls. Texture background of paste and mist will be completed for you.  XOX title is supplied in your kit, however, it may vary from sample shown.
Gorgeous floral flourish die included.

Scrapbooking Layout Kits


Beautiful
$25.00
This vintage style layout in neutral tones features our handmade "Beautiful Charming word" and everything you see on the layout, including all the die cuts. This stunning scroll with flowers die is also included.

Scrapbooking Layout Kits

 Happy Birthday
$19.99
Use lots of layers in this layout, created with the Captive Memories Cards  range from Kaisercraft. All with the added touch of my2angels charms, roses and skeleton leaves, plus a lovely flourish die.


Scrapbooking Layout Kits


So grab a Kit or two to keep you busy on these colder Autumn nights. A hot cup of tea, coffee or cocoa, a stack of unscrapped photos and you have the makings of a lovely, crafty night in. ;)

Scrapbooking Layout Kits


Saturday, May 9, 2015

Mini Gumball Machines

Someone asked me once where I get my ideas for OTP's from. The truth is - I really don't know - they just seem to leap out at me when I am looking at things. Out of the blue - at the weirdest  moments and looking at the most mundane things - ideas just come to me. ;)

So - I have these cute little gumball machines (thanks Alison Bevis for spotting them for me on one of your little shopping trips) - and then I got an idea ...

Whilst I love to make OTP's, I also try to make them functionally useful if possible and as Mazz Cairns would say, not "dust collectors" so I decided to make a pink one first (and a little shabby in style) so I could store my fuschia rhinestone dots.


Altered Gumball Machine


I started by covering it with Gesso, then while it was still wet, I scrunched up some muslin all over it. Then I sprayed it with some watered-down pink paint..


Altered Gumball Machine

I taped down some of our pink organza scalloped edged ribbon, bent one of our pins from the "Perfectly Pink" Flutterbies collection and added a pink butterfly (which had a pearl centered flower on it) to the top of the gumball machine.  

Then it was time to tie a bow with the ribbon and cover it with clustered flowers (also from the "Perfectly Pink" Flutterbies collection), some 1cm light pink roses, 1cm dark pink roses, pink sweetheart blossoms, large pink & white leaves, silver leaf charm and our pink pearl garland


Then I added a single flower from our White Felt Ribbon, which I centered with one of our roses.


Altered Gumball MachineAltered Gumball Machine


More butterflies from our "Perfectly Pink" Flutterbies collection,


Altered Gumball MachineAltered Gumball Machine


 The bottom edging was made with some scrap lace and more of our 1cm light pink roses.

Now to work on my blue gumball machine ... I am thinking maybe a nautical theme, with some of our blue scroll felt ribbon ... so stay tuned.

Altered Gumball Machine


Thursday, May 7, 2015

Happy Birthday Tags

For your next special occasion - why not give a tag instead of a card?


Tag 1


Start by smearing silver paint all over a piece of black cardstock. Add a 'trellis' die cut bit of patterned paper, muslin and some cut up pieces of our Black Butterflies & Flowers felt ribbon.


Pop on a butterfly from our Sweet Purity "Wings and Things" collection, plus a 1cm white roses ...


 and tuck in one of our Happy Birthday Charms, centering it with a piece of felt and a couple of 1cm white roses.
(Happy Birthday Charms are 5 in a packet for $1.60 available here)


Use some heat embossing (with some black glitter embossing powder and my favourite Kaisercraft script stamp) to add more background texture.

Our black gardenia (with the stamens cut out and liquid-glued Licorice Twist Sugar Beads added to the center) makes a lovely focal point.  Tucked in below the gardenia is our Silver Birdhouse Charm and I've added in a bit of stamped script to the open space at the bottom of the tag.


Tag 2

Start by cutting out a tag using some black cardstock.  Rip a strip of patterned paper for one side of tag and add some cut-up pieces of our Black Butterflies & Flowers felt ribbon for the other side.  

Now use some watered-down Kaisercraft Gold Paint (it must be metallic to show up on the black cardstock and we have the paint available here) to spray over your tag.  It gives it all a gorgeous glimmer!


Pop on our brown stemmed flowers, and some "word" stickers and a Brown Laughter Charming word to complete the greeting.


Finish off with a Bronze Bird on a swing Charm, some of our brown ric rac, brown organza ribbon and tea stained muslin - and ta dahhhh!!! You are finished. How easy can it get?


If you had fun making this card or like the technique - consider using the same gold spraying/Black Butterflies & Flowers felt ribbon technique again with our double page layout (that I taught recently) - available as a kit in the my2angels kit section here.


Wednesday, May 6, 2015

How to scrap those pesky un-matching photos!

You might know the problem: You have just a few photos from the one event, but they don't really match and are hard to scrap together. Here is how I solved such a problem. 

scrapbooking layouts

Inspired by pocket pages, I cut my 3 photos and 3 papers to 3x4 inches and matted each one on a 3.5 x 4.5 inch mat. By separating each photo on the layout it wasn't so obvious that they didn't really match. 

Now look for one element all your photos have in common. I realised that one thing all 3 photos had in common was that they all had black backgrounds (they are all night photos)! Some black felt ribbon was the obvious choice of embellishment to link the photos together. And not only is it self-adhesive and perfect to cut into smaller bits, it is also on sale for half price! You can find it in lots of colours and designs here.


scrapbooking layouts

From the Totally Turquoise Flutterbies Collection I used the cute  butterflies, which match beautifully with the teal and aqua papers. And here is also a vintage heart pull to go with the look:

scrapbooking layouts


At this point I felt I was looking at an overload of black and teal, so I decided I needed some light pink details to soften it. The pink of course is also in one of the photos - so this provides another way to link them together. I'm a big star of these scroll felt stars, they always look great. 

scrapbooking layouts

Find them in other colours and also in heart shape here. You can use one side for a filigree look (see black star) or flip it over for a chunky look (see pink star). 

scrapbooking layouts

A big floral wood button combines the teal and pink nicely. Find lots of nice buttons here:

scrapbooking layouts

Look, a cute tiny star charm:

scrapbooking layouts

... and a pretty pin and a stacked presents charm (because it was Christmas Eve).

scrapbooking layouts

So, next time you struggle to scrap some mis-matching photos, find a common colour, grab some felt ribbon and embellishments and go to town! If you want to see another way I used the lovely felt ribbon, click here.

scrapbooking layouts

  and here:

scrapbooking layouts

scrapbooking layouts