Thursday, October 15, 2015

Merry and BRIGHT - our OTP Light Kits

For those of you unable to make it here to the Gold Coast for a Christmas OTP class - we have something special for you too.

Our Charming Lights kits are available as a great gift idea for corporate events, family or even to just spoil yourself!

Each jar will be painted and fabric-coated when posted out - all you have to do is add the pretty trimmings contained within the Kit. Each measures approximately 20cm in height, with a 12cm diameter base.


Please allow a couple of days after ordering, as we make up kits as we receive the orders.

Black and Gold

A classic colour combination - this is a truly stunning light. The gauzy, gilt flower on the front is just breath-taking.


Traditional Theme

This light is a perfect match for those of you with a more traditional Christmas theme.


Blue and Silver

Of course I needed to do one to match the pastel tones of my favourite Kaisercraft Christmas range. Match them with some cards made up with Silver Bells paper and you will have the perfect Christmas table centerpiece.


Pink, Silver and White

And of course - we have Pretty in Pink (with Silver & White) for those of you who love love pink.


Purple Passion

A luxurious and rich purple with gold accents - this gorgeous light would make a wonderful adornment to any woman's (or girl's) bedroom.


White and Silver

For those of you with only a small space to make festive and no room for a proper Xmas tree - consider our classic white and silver Charming Light instead. Wouldn't it look gorgeous surrounded by a few Xmas pressies?


All kits are available for the reasonable price of $24.99 (not including postage). This includes everything you need to make these gorgeous lights (you will need your own scissors and glue).

What you will receive in your kit.

Prepared jar, painted and fabric/mesh adhered.
Lid pre-drilled for lights.
Battery operated lights (2 x AA batteries not included).
Electrical tape to secure your lights.
All beading (where required) on selective kits is pre-made for you.
Any handmade poinsettias in selected kits are pre-made for you.
Basic Instructions for putting it all together will be sent via email.

Don't have the colour combination you require?  Send us an email via the website on the "contact us" tab and we will do our best to assist.


Each kit has various products - they differ between the kit colours. Here is an example of the Black and Gold Kit.


For those of you who don't want a Christmas theme - perhaps a baby night light or photo framed light might be more your style? Please feel free to email us with your ideas and we will create something personalised to suit your needs.


Use a favourite photo...


or what about this gorgeous baby/nursery nightlight. What little darling wouldn't sleep better with all those flowers and feathers (polyclay baby included in kit)?

To place your order pop over to the website here


Saturday, October 10, 2015

Kaisercraft Home for Christmas

Hi! I'm back again, with more Kaisercraft Christmas papers. There are so many lovely Christmas ranges appearing, but it's a bit too early still for me! I don't mind getting a few cards together to send to special people, but when it comes to layouts....well the papers are beautiful and I'm using them, but sorry, there's not a Christmas Tree in sight!

My latest layout uses a few of the Kaisrcraft Home for Christmas papers available in the Paper Pack. 
I've titled it ''Not happy'' because my furry family member just hates rain. He can sense it coming well in advance of the first drops and immediately slinks off somewhere to hide. In this case he found our folded outdoor umbrella and put it to good use :)


The cardstock backgrounds here are Kaiser's Latte Weave and Coconut Weave. In between the two, top and bottom are thin strips of ''Laurel''. There are a few references to Christmas on this paper, but I've disguised them by using some torn strips of tape from the Tim Holtz Idea-Ology Symphony 2pk.

There are four stages to the background on my white cardstock. First I cut a cloud shape from a spare piece of chipboard and using it as a mask, gently inked the edges using three shades of brown distress ink and an Ink Blending tool - first Antique Linen, then Vintage Photo and finally a very small amount of Walnut Stain. This was repeated across the page several times until I was happy with the outcome.

Next, white texture paste through the Kaisercraft 12x12 Leaves template....I don't know if Tracy will have any of these templates in stock after the ''Creative Fun with Tracy from my2angels'' class at Shelley's Land though (I am sure she will order more in if you want one)! I love the way the ink colours can still be seen through the texture paste.

I've added a bit more colour using a small polka dot stencil and Champagne Modelling Creme, and then painted on some Silks acrylics in green and brown tones. Most of this is under the photos, but I have left the edges and some drips exposed.


The layers of paper under my photos are from ''Laurel'' (both sides), ''Season'', and ''Poinsettia'' with a piece of dictionary paper torn and tucked in between the layers. I have also die cut some labels and tags to add interest and to highlight the words ''rain'' and ''umbrella''. My leaves are also die cut - this time using the ''Decoration'' paper and a few pieces of plasterer's tape add to the texture without being too intrusive.


My title....the happy part...is heat embossed using Stampendous Aged Embossing Enamel - Scarlet.
The detail - of course there are flowers. The Red and Cream Cherry Blossoms are old stock, but you can still get the Cream. There is also a 2 tone Brown Sweetheart Blossom, a Cream and Green Rosebud and a flower from the Seeing Green Flutterbies embellishment pack. 


There is also the light green butterfly from this pack just underneath. A tiny Antique Bronze Bird on a Branch charm is dangling from one of my die cut labels, just for fun. There are hundreds of cute charms to choose from in the store here, and you can get the jump rings here.


Just a few added Stampendous Mica Flakes and some Sugar Beads add a pop of colour.

Because I hate my messy handwriting (I think most of us do!) my journaling strips were printed onto a piece of  ''Laurel'' and popped up onto dimensional squares. Much tidier :)


The Home for Christmas Paper Pack has two of each of six lovely double sided papers included - that's 12 different designs, plus a bonus Sticker Sheet. Plenty of room for creativity there - and you can even use it for your Christmas projects!! 


Monday, October 5, 2015

2015 Off the Page Christmas Class - Frozen Lights


Frozen Lights

It is that time of the year again ... it's time to unveil the my2angels annual Christmas OTP for 2015. This year we are making a northern winter wonderland, complete with snowman and reindeer. Check out this cute little cottage and wintery garden - everything a sparkling white - from the snow covered rooftop to the icicles on the fence.


Christmas Altered Item


All the trimmings are in silver - from the gorgeous festive wreath on the front gate to the twisted garland along the fence - and a host of little touches everywhere else.


Christmas OTP Project


Loving the tree - it's made of tinsel and we will make one in the class together.

There's a hidden surprise to this year's Off the Page Project - when you turn on the lights - you can display your "Frozen Lights' OTP to best effect ...

   Watch the street lamp, doors and windows all light up the frozen beauty of your cottage - along with the base of the OTP.


Christmas OTP Project


Be sure to book in quickly for your one of a kind Xmas decoration. The Xmas OTP classes book out fast - you don't want to miss out and be disappointed.

Bookings for Frozen Lights at my2angels, Gold Coast can be found here
Or to come along to Shelley's Land on the 25th October pop over to the facebook event page here.


Christmas OTP Project

Sunday, October 4, 2015

New Arrivals in store at my2angels


Kaisercraft October Releases

FAIRY DUST

Who wouldn't want a touch of Fairy Dust in their lives? Featuring whimsical images of butterflies, tiaras and dandelions, this collection will leave you enchanted! It's like you've stepped into you're very own fairytale wonderland!
HOLLY JOLLY

Celebrate the fun and joy the silly season brings with this jolly collection. Featuring a bright colour palette and simple Christmas imagery, this merry collection is a modern take on the traditional season.

We also stock Kaisercraft Inks, Paints and Pearls which are all located in the new Kaisercraft Section on our website here

Inks only $1.99 each


Pearls Strips $3.99
available in 4 colours


Our personal favourite Multi Media Product is back in stock ... Ferro Metal Effect Paint

Ferro is a totally unique special effect color that delivers a real metallic finish.
Use it to decorate and enhance any project both indoors and out.
It is a permanent water-based acrylic and can be used on paper; cardboard; ceramic; wood; stone; terracotta; and plastic.
It is suitable for use on walls and can also be used by artists as a sub-surface.


Ferro is the perfect medium to use with the new masks from Prima instore now


and an all time favourite with our customers is Emboss It Dabber by Ranger
The Dabber is filled with Ranger's high-quality embossing ink in a convenient dabber top bottle. The Emboss It™ Dabber is great for quickly and easily inking large stamps and surfaces.
Available here 

Scrapbooking Craft Products


Hoping everyone is enjoying the long weekend and creating up a storm

Scrapbooking Craft Products


Sunday, September 27, 2015

Kaisercraft 6.5" Paper Pads for Card Making

Kaisercraft 6.5'' Paper Pads are absolutely perfect for making cards and tags for any occasion, but especially for Christmas!!

I've used the Silver Bells  paper pad this week to make these pretties....

Handmade Christmas Cards

and and A Touch of Gold to make these....

Handmade Christmas Cards

First the so very pretty, pink, blue and grey 
 Silver Bells -  I used a Kaisercraft Pink Square Card and Envelope and a gorgeous pink and silver foiled paper as the base for this card.  

Handmade Christmas Cards

I fussy cut the baubles from another sheet of paper, and die cut the pine needles from a third. I think the ribbon came with some chocolates last Christmas, but it was perfect for this card, and reflects the colour of the beads in the Silver and Pink Merry Christmas Charming Word embellishment beautifully. The biggest bauble is popped up on dimensional squares, and the smallest is hanging from a line of tiny pink pearls.


Handmade Christmas Cards

Because I like to have something pretty to write on, the insides of my cards are usually decorated as well. This time I cut two baubles from a Stacking Baubles die set (from Shelley's Land of course!). Again the papers are from the Silver Bells 6.5'' Paper Pad, as is the ''Seasons Greetings'' tag. I finished it off with a shiny Silver Christmas Wreath charm.

For my tag, I embraced the blue. The base is an Inkssentials Manilla Tag #8 and is covered on both the front and the back with a blue and silver foiled piece from the Silver Bells 6.5'' Paper Pad.

Handmade Christmas Cards

Up in the top corner is a torn piece of grey/blue paper featuring a music print and some blue baubles. I softened the torn edge with a thin brushing of white gesso. Hanging on pieces of White Pearl Garland, from a grey die cut branch there are some fussy cut blue, grey and pink baubles. To add to the snowy feel of this tag I added some texture paste both top and bottom and also just on the top of the baubles - I just used a paint brush to blob it on. There's also a touch on the top edges of the three tags at the bottom. These are all die cut pieces included with the Paper Pad, and are sitting on a piece of frayed muslin. A triple circle of White Pearl Garland around the Merry & Bright sentiment finishes the tag off. 

Handmade Christmas Cards

The same applies to my tags as to my cards...I have to have somewhere to write. So on the back I have added a small tag and a Silver Double Star charm.

Next, I started on the bolder and more exciting A Touch of Gold. Again, all the papers used are from the 6.5'' Paper Pad. I have used the same paper as a base for the card and a lining for the envelope.

Handmade Christmas Cards

The gold line of gold trees, and the white pine needles are die cut, as is the cute christmas bird. If you look closely you will see that the bird's eyes, his wing and his santa hat are all popped up on dimensional squares, as is the Love, Peace, Joy tag which is included in the Paper Pad. 

Handmade Christmas Cards

The inside of this card has had the same treatment as the first one did, the only difference being that this one has a Gold Christmas Holly charm. It's a very simple card - let's face it, I'm not the best card maker in Scrapland :), but I think the great patterned papers in this paper pad make it look good.

My tag started out being for Christmas, but I think it could be used on a gift for any exciting occassion. The front and back of an Inkssentials Manilla Tag #8 are again covered with papers from the 6.5'' Paper Pad.

Handmade Christmas Cards

I stamped the four balloons on a few different sheets of paper, cut them out, and then used them and several of the included die cut tags to build up some layers, with a tangle of golden yellow cotton between the last two of them. My cute bird is wearing a party hat this time, and I have used Gold Inka Gold to paint on its spots. This was also used to colour the backing filigree of my Black and Silver Celebrate Charming Word. Again I have used dimensional squares to add depth to the tag. Three of the balloons, the tags and the bird (as well as his wing, eyes, beak and hat) are all popped up. For added party bling I have embossed some of the edges using Gold Embossing Powder and added a few Golden Yellow and Clear Rhinestone Dots.

Handmade Christmas Cards

Again, on the back I have included a tag to write a message on.

Enjoy!!

Handmade Christmas Cards

Thursday, September 24, 2015

Christmas Bauble Shaker Box Card

"Silver bells, silver bells, it's Christmas time..."  

Oops - they're not quite silver and yep, it's not quite Xmas, but if you started making these now, you will have plenty in time to send out for Christmas this year. As you can see, I am still loving this range from Kaiser. I had a go at card making - who wouldn't with the yummy Christmas dies we have in stock and this stunning Xmas paper?

Using one of our many Kaiser cards, re-fold your card as shown below.


Handmade Christmas Cards

Adhere Silver Bells patterned paper (trim to 0.5 cm less than card) to both sides of your folded card (paper packs are available here).

Handmade Christmas Cards


With the Kaisercraft Flourish Baubles Die (available here) make a sandwich of patterned paper, acetate and the patterned paper again - and put through your die machine.  By cutting them all together, the acetate won't fully cut the middle bits and the bottom layer of patterned paper will only have the outer part cut because the acetate blocks the inner decorative part of the bauble cutting through. (How awesomely clever is this!!! Ngaire was soooo impressed with me - cause she could not work out how I had done it until I explained how - and I just love to keep her guessing!)

Now cut out the middle of the top bauble to make a bauble frame (you could use this in so many other ways - little photo frames, etc).

Handmade Christmas Cards

Glue the acetate to your cut bauble.

Add a silver rhinestone dot and a 25 Dec typewriter key to the backing bauble, then some Blue Lemonade sugar beads. 


Now add foam tape to the inner rim of your top bauble - over the acetate - and adhere to the backing bauble.

Handmade Christmas Cards


 Attach to the front of your card with white organza ribbon and one of our holly charms. The put to one side - because now you have 1 (one) card on your way to a Merry Christmas. You could get a real production line going with these.

Handmade Christmas Cards

Handmade Christmas Cards


Monday, September 21, 2015

Embellishments make every Layout special


Every layout is unique, and what better way to make your layouts special than to use my2angels embellishments.
You can use charms, flowers, Tracy's amazing creativity and your own bits and pieces to make your layouts stand out from the crowd.
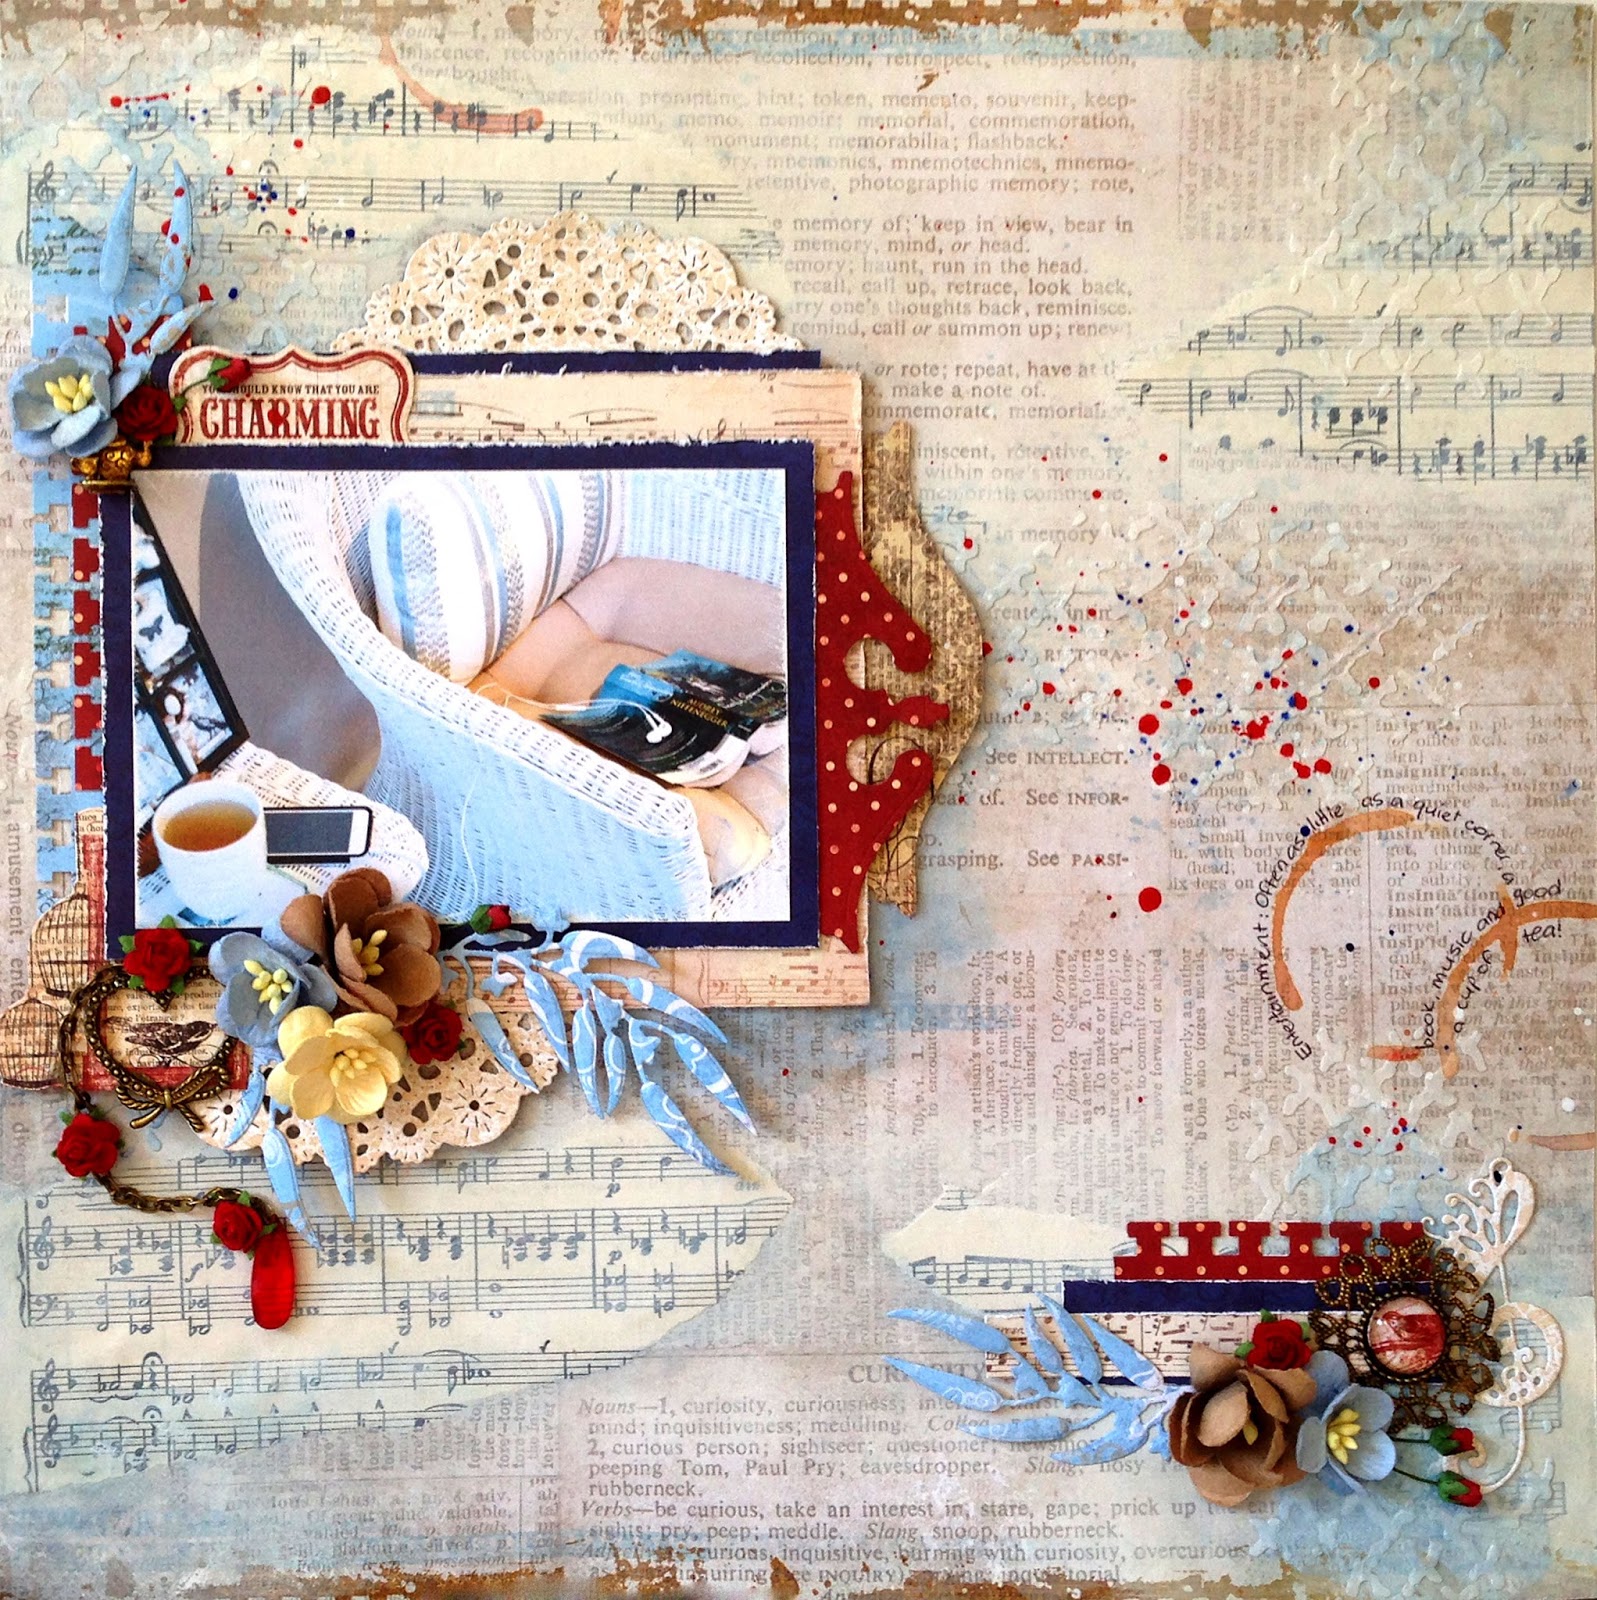
My latest layout is for a challenge - the colours and the elements I've used fit the criteria, but the embellishments on my layout wont be the same as anyone else's.

The theme is entertainment, and I'm afraid that I am past the bright lights, loud music and excitement of nightclubs, bars and parties. I much prefer a good book, some music and a cup of tea in my sun room, looking out over my sometimes unruly garden. (Not that I can't be persuaded into a glass of wine or two now and again... LOL!!)


I've used torn up music paper and gesso to mute the background paper and form a base for my added texture. Just white texture paste through the Crafters Workshop Butterfly Collage Template.

 
I wanted to add an edge to grunge up the paper just a little so I used the Kaisercraft Texture stamp - Film Edges, along with Stazon Timber Brown ink and Sky Blue Archival ink for this.

The ''tea'' stains were made with Tea Dye Distress Ink and whatever round bottomed thing was on my desk at the time - I think it was the Texture Paste jar.


The blue ''shadows'' under and around my embellishments and in the corners were brushed on with diluted Sky Blue Archival ink, along with a thin coat of Iridescent Medium which didn't add any colour, but gave the dull ink a pretty shine.

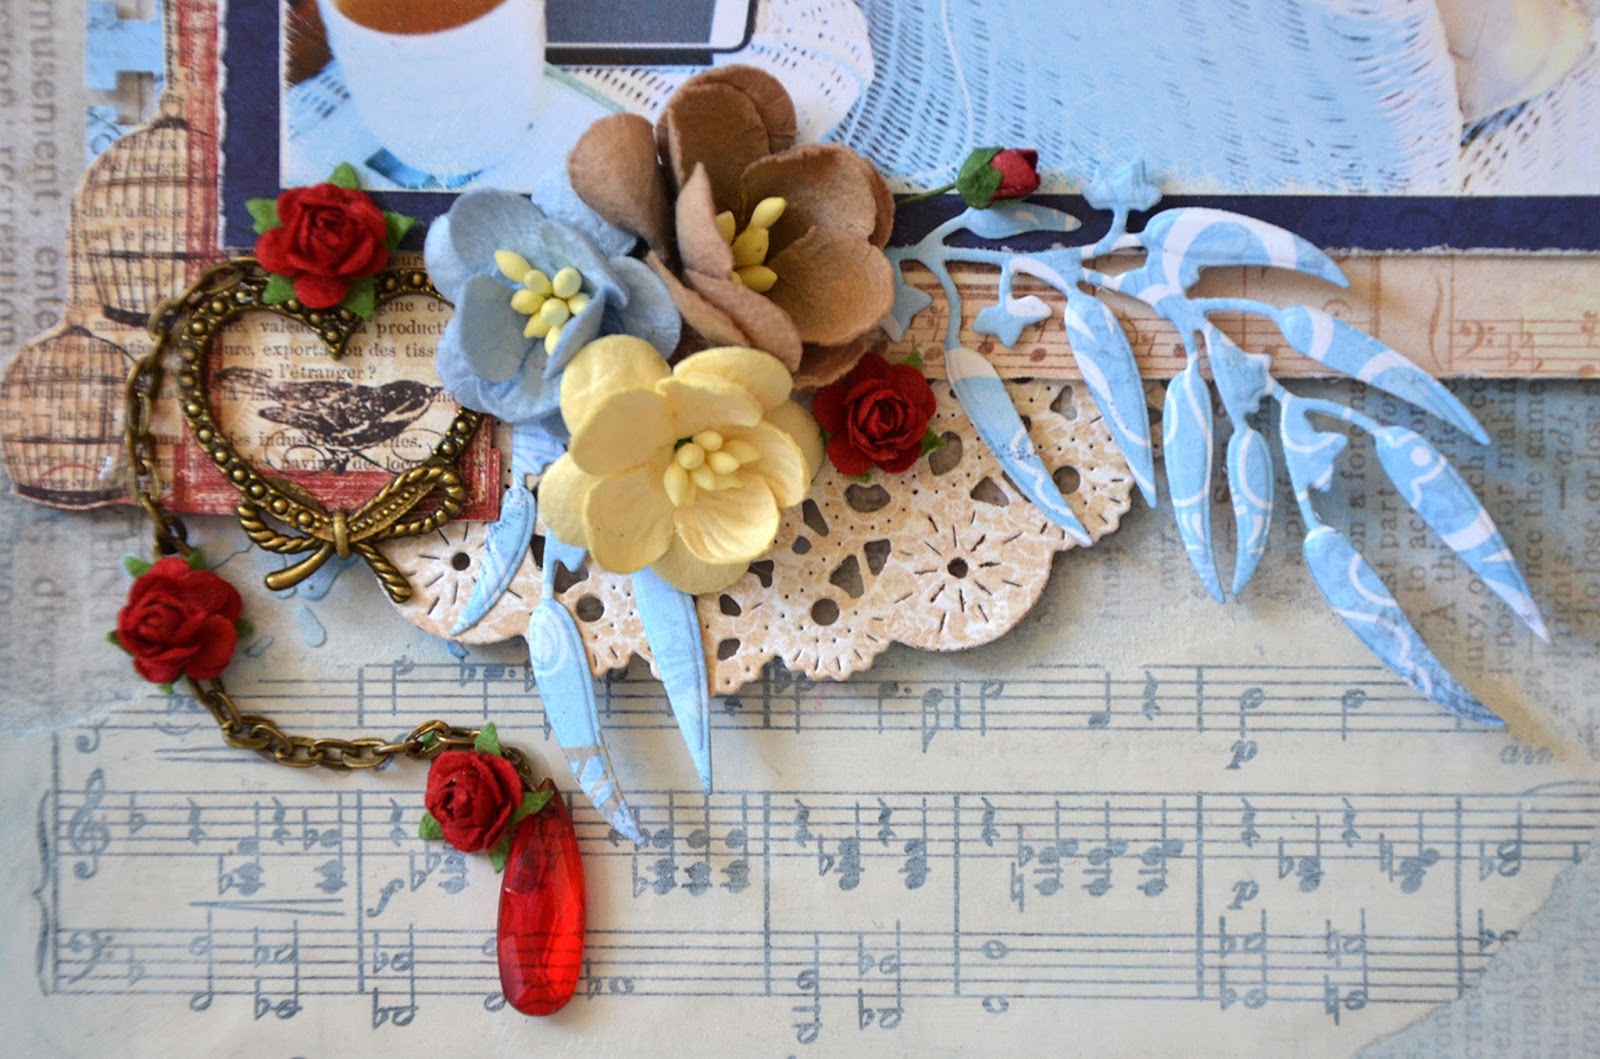
There are three small embellishment clusters, each with its own my2angels addition. Besides the usual beautiful flowers - Baby Blue, Creamy Butter and Brown Cherry Blossoms, small Red Roses and Red Rose buds - there is a Silver Teapot charm coloured with Brown and Gold Inka Gold peeking out from under the flower....


Next, I made the bird embellishment using an Antique Bronze Square Filigree (I cut off the edge to make it round, and a bit smaller and more delicate), and a tiny bird from some patterned paper under a Transparent Glass Cabochon. Absolutely unique :)


Finally, framing another small bird, is a BEAUTIFUL, BRAND NEW my2angels creation. An Antique Bronze Heart with a rose scattered chain attached, finished with a pretty glass bead dangle. I'll be needing this one in all colours! Love it!!


These will sell out FAST - get yours before I get them all.... LOL!


Sunday, September 20, 2015

New Love Heart Charming Chains in store for you to order now

The newest handmade embellishments from my2angels are now on our website ready for you to create with. 

 Introducing our Love Heart Charming Chains - A large Heart Charm with delicate roses and tear drop bead all hanging from an antique bronze chain and yours for only $2.99. 

 Available in 9 colours in the Charming Chain section here 


Handmade Embellishments


Hang them, bunch them, loop them, or frame your photo with - the limit is only your imagination. 


Handmade Embellishments


Handmade Embellishments