Tuesday, June 14, 2011

Playing with Mulberry Paper Flowers

Hi scrappers
Geli here today

I've had a little play with some of the beautiful flowers from my2angels. Usually I simply cluster them for embellishing, so I've had to think outside the box. First thing that came to mind was an obvious choice - spray a flower with a little glimmer mist

Simple, yet effective. I especially like it on the black gardenia, the glimmer really stands out on black. The white ones would also be a super easy to colour that way.


Next I took 3 mulberry flowers.


The edges of the petals are already coloured, so half the work is done for you. Fold each one in half and then in half again. Using glue dots I glued them onto a pendant with the points touching in the middle. 

Curl the edges of the flower petals a little with an awl and glue on one of the cute little embellishment pins

There are so many to choose from that you will find the one to suit your project. 

Simply add a bow to the bottom of the pin and you've got a pretty fluffy flower.

For an off the page project here's a super simple way to make 3D posey:


Take 3 small flowers
Thread 3 gold stamens  through the middle and scrunch up the first flower into a cone shape and keep it in shape with a little sticky tape along the stems of the stamens. 
Use a second flower in the same way, but scrunch that one a little less and the third one only gets a tiny scrunch. 
Bunch out the stamens and glue it all onto a leaf  and finish it with a little bow. If you spray your flower with starch (the kind of ironing spray I would have if I was a better housewife...) it'll keep its shape better once dry.
What else can you do with flowers?


Well, you can use 4 petals and glue them behind a key charm  and make a super cute butterfly. Stamens  make perfect antennae. And you can put some feathers on a bird charm's tail.

Have fun with paper flowers!
GELI

Friday, June 10, 2011

Playing with Acrylic Buttons

Tips for altering acrylic buttons
Doodle on them….the design options are endless!


Lightly cover with dimensional magic
Sprinkle with Diamond Dust
Spray with glimmer mist
Dry with a heat gun


Heat with a heat gun for around 10 – 15 secs (Be very careful as they will get hot) then quickly stamp over the top. I find texture and background stamps work best.
You will now have a cool image imprinted in your button!
Swipe some ink or paint over the top.
Then wipe excess off….you now have one funky textured button!


Cut a circle of patterned paper to fit in the middle of the button
Ink around circle
Adhere to button
and lastly, coat with crackle accent or glossy accents


Tie a bow with thread.
Separate thread


Tie a bow with thread or baker's twine
Place button on page bow side down….looks great!


Use ric rac, lace, baker's twine for centres…You don’t have to tie a bow. Sometimes tying a knot then leaving the ends loose can look pretty cool…and of course you can always stitch them to your page!


Doodle on plain chipboard for a funky look


Stitch onto your page with contrasting thread for a funky look!


Make your own Buttons

Cut a circle out of core board. I use everyday household items to trace around for circles ie toilet rolls, lids, jars of distress paint etc then

Ink around the edges


Spray with glimmermist


Paint with distress paint on flat side of coreboard
Stamp over the top….looks gorgeous!


Spray with glimmermist on flat side of correboard
Spread some stickles over…..I find using my finger is the best way
Dry with heat gun


Love and Peace
Jess

Wednesday, June 8, 2011

Pretty Buttons

So for all the girly and pretty layouts out there here are a few suggestions to "beautify" your buttons


Take one of our light pink acrylic buttons 


and apply Dimensional Magic in the middle (or any liquid glue of your choose) and sprinkle with diamond dust


Wait for glue to dry and gently shake off the lose diamond dust
then apply one of our pink rose buds


and if you want then centre one of our white with pink tips flower with your "pretty" buttons or leave as is


orrrrrrrrrrrrr

take one of our brown wooden buttons


then centre our 7cm brown gardenia with your buttons


and you have this (with a few things surrounding it)


Hope you like!
And if you are at the Craft Expo in Brisbane this weekend you will see this pot IRL as it is part of my display :)

Tracy :)

Monday, June 6, 2011

Buttons on your creations ....

To inspire your creative flair and talent, over the next 7-8 weeks the DT girls and I will be showcasing one product each week to inspire you with different ideas, techniques and cool ways to use these sometimes forgotten but awesome products. 

Our store is brimming with these amazing products and our goal is to show you some unique ways to incorporate these products into your LO, card or OTP projects. 
Embed them in your project or make them a feature that stands out and gives your project some energy and oomph!!! 

Beginning this week with Buttons...

Here we go ...

Add buttons to circles on patterned paper to add dimension and interest


Use a button for the centre of a flower


Buttons look great in clusters!!


Use buttons as “bubbles” on a layout

Use a buttons to replace the “O” in a title

Place randomly in the white space on your layout….then doodle around them to add interest

Stick them randomly around a photo frame for a funky border

Make a buttons flower by placing one large button as the centre, then add little buttons around it for the petals

Use for eyes on your birdy chippies

Use as “fixers” for envelopes. Place one button on the pointed end of the flap. Place another just under it on the pocket part of the envelope. Make a “figure eight” by looping twine around the two buttons

Stick different size buttons on a card in a cluster then add twine “strings” to them for button balloons

Use a big yellow button as a sun then doodle or stitch “rays”

or 

create a button mosiac by die cutting a shape and filling it with buttons


or have them as the feature on a card


This is just a start ... we were surprised at how many ways we came up with using buttons ... stay tuned 


to view the my2angels range of buttons click here

Friday, June 3, 2011

The Girls Paperie Layouts and one last Spring Market Card

Hi girls
Lindy here ...

I’ve just got 2 layouts to show you
using the Girls Paperie Paper Tinsel and Twig range 
The first two papers I used are Deck the halls and Tinsel and twig  

I used the reverse side of tinsel and twig sprayed some glimmer mist intermittently
and with the tinsel and twig paper cut out all the different shapes on the reverse side…. matted the 2 small photos which sit nicely in the middle of the papers…


punched out some butterflies with left over scraps and dabbed some Ranger ruby red  perfect pearls onto them


With the leftover scrap I made some flowers using a flower punch, and placed a  Flower stem and some bakers twine


Then I placed a tag and cut out a journal tagstar on the tag inked around the tag with a blue rhinestone star and  Jumbo Java versamark.  Place some thickers for the title a printed word …                     


Now onto the next layout, this one has a shabby look
Taking the other 3 papers in the range Holly berry floral, Festive brocade and Snowfall
And cutting them to fit the layers and even the strips  come in handy…sand around the photos for the distressed look … on the strip in the middle I place some white black lace and felt ricracThe thickers were perfect for this page and I printed out a verse to match the shabby look


Towards the top if the page I place some leaves flowers and a scrapware butterfly   and inked it with versamark rose red
 
                                                                                           
Under the laces I inked a scrapware tree withVersa mark Jumbo Java, placed gardenias,a handmade rose and a felt heart


Lindy
                                        

and lastly,
Keonie's
Just for You card using the Webster's Spring Market Collection


I made this card using a collection of Tracy’s irresistible flowers.  There are some stemmed flowers in two-tone brown and red, blue canna lillies, and the beautiful petite closed rose buds in brown and black.  I arranged all these in a bunch then tied them together using Lemondrop Baker’s Twine.  I also slid in one of the my2angels Happy Birthday Pin embellishments. 


To adhere the whole element to the card, I used a hot glue gun but you could do it with wet glue as long as you apply some sort of pressure for a little while to help adhesion.  To use up some left over scraps of the Webster’s Spring Market papers, I cropped a ‘farmer’s market’ label from the Market Menu paper, made two score lines approx 1 cm from each end and kinda bent the middle section to allow it to sit over the stems of the flower bunch.  


 I then cropped the spring market strip from the bottom of one of the patterned papers and shaped one end to look like a banner and attached it to the farmer’s market label with two metal brads.  Using DS tape or Dimensional magic (DM), adhere this element over the flower stems by placing the adhesive on the underside of the two scored folds.   

To finish the card I added my title using the Spring Market Alpha Stickers, and threaded one of the stamens in the centre of the brown stemmed flower through a lady bug charm.  I did help this along with a few dabs of DM to help little lady to stick.   

Finally add some DM to the birthday pin, sprinkle with glitter, and use a ruler and black pen to add some outlining.  You are done!

Keonie

Wednesday, June 1, 2011

Sale Time and introducing our Newest Design Team Member

SALE TIME
Up to 50% off ALL pattern papers (most of these will not be restocked)


  30% off rhinestone chain
  30% off Rhinestones words and shapes
  50% off Felt Ribbon
35% off rubons
  10% off scrapware chipboard
up to 50% off ribbons (excludes organza ribbon and lace)

AND until 10th June 2011 enter "stocktake" at checkout to receive an additional 10% off your order (not valid with any other promotional codes and discounts and excludes any future new arrivals)
There is no free gift this month with your order due to the discounted sale we are offering you

and ...

I have the absolute please in announcing
our newest design team member


I have followed Cathy's blog for sometime now and always admired her gorgeous creations, scrapping so many various styles and such a gorgeous lady who I had the pleasure of meeting a few weeks back when we had a girls scrapping sleep over.  I am so looking forward to seeing her inspiring creations using my2angels products
Pop over and  check out Cathy's blog here BUT FIRST read on ....

Hi Ladies 

First up I'd like to give a huge thank you to Tracy for asking me to be part of her very talented Design Team... am so very excited and I hope I will be able to inspire all you lovely ladies with my creations.
Well here goes.. this is my 1st DT LO which I created with some of the yummy goodies I received from Tracy at my2angels!


One of the things I love to do is mix different ranges of pp's together and with this LO I thought the Girls Paperie Twig and Tinsel , Basic Grey Jovial and Websters Trendsetter, went together beautifully.

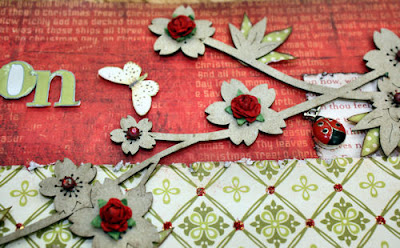
I was inspired to use a lovely Scrapware Blossom Stem chipboard piece which went perfectly with this lovely pic of my daughter Brittany.

I traced the leaves on some Twig and Tinsel - Festive Brocade (spotty side), cut them out and inked the edges with Tim Holtz Vintage Photo Distress Ink, placed them behind the chipboard leaves to create a shadow effect. Couldn't resist using some of the new red roses which Tracy has just recently added to the store and placed them randomly as flower centres on the chip board. I also used some red multi-coloured acrylic rhinestone chain, snipping off single rhinestones and placing them in the rest of the flower centres. (BTW the red chain is on sale this month at 30% off!)


and had to add a gorgeous little ladybug charm for a bit of extra cuteness.


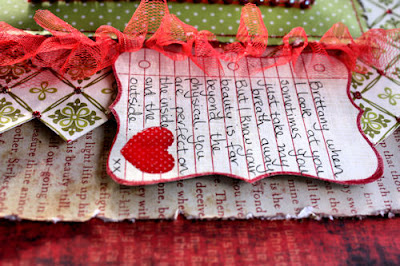
The red flipside of the Basic Grey Jovial - Pomegrante was perfect for my background... such a luscious red!! I then layered some Twig and Tinsel pps. A strip of Twig and Tinsel - Deck The Halls (the text side up) and the same paper on the reverse side which I hand cut to make a lovely border and added some Christmas Red Stickle Glitter Glue around the diamond pattern to add a bit of bling. On top of that I added a layer of Twig and Tinsel - Festive Brocade to accent my photo, cut some red multi-coloured acrylic rhinestone chain to make a frame for my photo, tucking in a bit of gathered red tulle underneath and machine stitching around the the edge. I also inked my edges with Tim Holtz Vintage Photo Distress Ink and distressed them for a bit of definition.

The title was made by hand cutting the letters from a piece of Websters Trendsetter - fashionista and then coating them with some Inkssentials Glossy Accents and the journal spot was stamped with a Teresa Collins Notepad stamp and red ink, I then coated the heart with the glossy accents to make it pop.

A gorgeous little cluster to tie in with all the beautiful pp's made with a felt heart, grunge date pin, love key charm tied with red & white Bakers Twine and a layered flower made with 2 red mulberry flowers, a white mini gardenia with some diamond dust on the edge of the petals for a bit of texture and a sweet red & white plaid fabric brad for the centre.


Finished the LO with some sweet butterflies which were hand cut from some Websters Trendsettter - Style 105.
Thanks so very much for taking the time to stop by and have a fab day :)))
Cheers
Cathy :)