Sunday, July 24, 2011

Embellish Me


Do you find yourself admiring the embellishments you see on online layouts 
and wonder how they find the time, creativity and money to produce them?

Does your budget not allow you to buy all the mediums and products you want? 

Are you a bit afraid to spend so much on a product you may not use again?

Or maybe time just doesn't allow you to create as often as you would like?

Did our recent blog posts leave you wanting to make some of the glimmer misted
soaked chipboard; or the butterflies with resin flowers or maybe the diamond dust coated alphas were more your style ... whatever your favourites, 

Then let me introduce you too ....


We have put together a monthly embellishment kit for you that will wet your appetite for new products and perhaps encourage you to try something a little different.


Each month we will send you my2angels embellishments and handmade creations, in which I can guarantee there will be a touch of Tim, a dash of charm and some altered chipboard to add to your creations.

Here is a sneak peak of JUST A FEW items you will receive in your August Kit


This kit is about saving you from the expense of purchasing a myriad of expensive embellishment mediums, yet still allowing you to enjoy handmade embellishments using these mediums.

It’s about allowing you to ‘sample’ some of the top Brand name-embellishments – without the expense of purchasing large multi-item packs. This way, you can play with a little of everything, rather than a lot of one thing.


In fact, in some ways, this embellishment subscription kit could be called a sampler pack – allowing you to view used results with the products for a fraction of their cost - and decide if you would like to then purchase in larger quantities 

For only $55 per quarter - paid in advance (this includes postage) - you will receive 3 kits (that’s 1 per month) sent on the 20th of each month.

That’s amazing value – all that yumminess and creativity -for less than $19 a month (average kit RRP $30.00)

No two handmade embellishments will be identical, thus giving you the ultimately unique embellishment kit. 

You may cancel your quarterly membership at any time, however, we request that you do so with at least a months notice before the start of the next quarter, as kits are prepared and products ordered in advance.
(kits are only posted to Australian Addresses)

AS A SPECIAL OPENING OFFER (AND TO GIVE YOU THE OPPORTUNITY TO SEE WHAT WE ARE OFFERING) WITHOUT COMMITTING FOR 3 MONTHS

WE HAVE ON OFFER A ONE MONTH SUBSCRIPTION ONLY FOR AUGUST ...


TRY US ... WE GUARANTEE YOU WON'T BE DISAPPOINTED WITH THE QUALITY AND QUANTITY OF PRODUCTS IN THE KITS


HERE ARE TWO LAYOUTS COMPLETED TO SHOW YOU THAT OUR KITS ARE NOT DESIGNED FOR A SPECIFIC STYLE OF SCRAPPER (NOT ALL PRODUCTS ON THE LAYOUTS ARE IN THE KITS, IT IS JUST A SAMPLE OF A FEW)


 TFL
Hope everyone is having a great weekend


Friday, July 22, 2011

Scrunching, Pleating , Rolling and Gluing

Hi Girls,
Cathy here today

It's a bit of a long post from me for this week as I have a LO, 2 cards and tutorials to share so bear with me. This week My2Angels is focusing on using ribbons and lace and we are showing you techniques on how to incorporate them on your own creations.


First up is my Ribbon LO. 

I started with Kraft Cardstock (which is only 75 cents at Tracy's store.. bargain!!) for my background and then used the yummy Websters Yacht Club Diecut and other pp's from the Yacht Club range which I hand cut and layered with foam tape. 
Websters pp's are just perfect for fussy cutting and are one of my fav ranges for this technique.

I added some textures to my LO by using some of this beautiful cream lace flower trim to frame my photo and some hessian. 

The roses were made by rolling some ric rac... loved trying out this technique and you can have a go at making your own by following Tracy's tutorial which is further down this post .. so easy to make!!


Using ric rac is a great way to simulate waves and I used some beautiful blue velvet ric rac here, creating some lovely soft textures.


With all the charms Tracy has in store, you're bound to find the perfect embellishment for your LO's and I used two of them here. The Yacht charm which 
I tied with some Bakers Twine and the gorgeous fish charm which is swimming in amongst my ric rac waves.

I decided to combine stickers and pp's for my title by hand cutting the gorgeous alphas from Websters using the Yacht Club Alpha Stickers. 
I also hand cut the little white butterflies from the Websters Trendsetter Style 105 pp and finished off with one of Tracy's fab memories embellishment pins and some Jingle Bells glimmermist.

With my 1st card I decided to go masculine and used the Websters Yacht Club pp's again which I hand cut and layered and some Websters Seaside Retreat for the background. 
For the ribbon detail on this card I scrunched the organza ribbon for some texture. I have added a simple tutorial for those of you who haven't tried this before.


How cute is this turtle charm.. like I said before Tracy has a charm for all your LO's. 
Check out the COMING SOON section at my2angels as Tracy has some new charms which will be available within the week.

For my 2nd card I went bright and feminine using more Webster pp's in the Spring Market & Wonderfall ranges & some Basic Grey for the background. I hand cut & layered the papers and added some mini roses & a dragonfly charm for a little interest. 

On the border of the card I layered some velvet ric rac and a border sticker from the Spring Market image and phrase sticker sheet. I changed the colour of my white organza ribbon with some Tim Holtz Mustard Seed Distress Ink to match my pp's and then pleated the ribbon for some texture. 

For the sentiment I used the Spring Market alpha stickers.


I have put together 2 quick and easy tutorials on scrunching and pleating ribbon.

Scrunching Ribbon


Start with sticking down some double sided tape where you would like your scrunched ribbon.


and scrunch the ribbon as you go.. if you want a messier look don't be too particular about how you scrunch it.


Pleating Ribbon

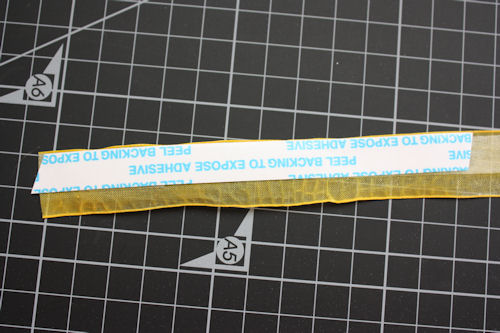
Pleating ribbon is a similar technique but instead of placing the adhesive tape on your project I adhere it to the back of the ribbon to be pleated. 
You can just pull the backing off as you go, to make it easier, then pleat and stick down.
It will stick up, so you can use you sewing machine to stitch in place or place bits of tape under each pleat to for a nice flat finish.


Hope you enjoyed some the of the simple ways I incorporated ribbon onto my LO's and hope to see some of your ribbon inspired creations in our gallery.

Cheers
Cathy :)))


Ribbon Rosettes
by Geli

Making ribbon rosettes (with a version for seamstresses and one for the sewing impaired)


Here's a great way of making ribbon rosettes.

Take 1m of my2angels girlfriends ribbon , and gather it in loops with your sewing machine. I simply fold the ribbon as I go.
Sew only along the edge of the ribbon.
The smaller the loops the better it will look.


Your ribbon is now only about 1/3 of the original length.


Cut a circle (about 4cm diameter) from sturdy cardstock. This does not have to be perfect as it won't be seen.
For the next step I have used a hot glue gun (cause I'm the impatient kind).
You can also use Pritt glue  and hold down each section for a little while till it sticks. Starting from the outer edge, glue on sections of the gathered ribbon until you've come all the way around. Then you start overlapping the previous row. Like a snail. You get it.


When you come to the middle leave a small empty space


Now you glue in a cabochon flower or an acrylic flower , daisy charm flower or a flower from a rhinestone chain .
Whatever takes your fancy.


This looks great on a hair pin or a head band too!
Are you a sewing impaired person?

Don't despair, here's a cheater's way (though it's not as sturdy). Stick some 6mm double sided tape along one edge of the ribbon and peel it off one bit at the time as you stick it on the cardboard circle.
Pinch it into loops as you go.
I used about 1/2m of ribbon.


Finish the centre however you like and you're done in a flash.
This is also great for ribbon that won't sew easy, like the glitter ribbon  I used.


If you have mastered the art of pinching and sewing you can do all sorts of cool stuff, even sewing in the middle of the ribbon and using it as a groovy border.
Big loops will look good for boys, too.


Geli


by Lindy


Using the 10mm organza white ribbon cut ( 5) 2inch strips


Do a running stitch on three sides of the ribbon starting from the narrow side up along the long side and down the wider side and pull together to make one flower (figure 2) and sew together in the centre


Just added some bling to the centre of the flower and some loops of rhinestones to the
back of the flower. (and Tracy some has feathers now in store which will look great on these also)
I also make a black flowers with white acrylic rhinestone chain and a rosebud 

Glue the bud on with glossy accents (fantastic glue I use this on everything ... (Tracy uses Dimensional Magic for all her gluing but I love glossy accents so there are two choices for your gluing needs and they also are a glossy medium as well) 


Lindy


and from me, Tracy
with Ric Rac Flowers

What do you need:
 

Needle and thread to match your ric rac (or hot glue gun or any other quick drying glue suitable for ribbon)

Scissors


Take a piece of ric rac and fold over the end on an angle and secure with a couple of stitches

(this usually turns me off making flowers so I use my hot glue gun instead)


 Start to roll your ric rac around your stitched end, stitching to secure as you go (or glue)


On each roll, pinch the bottom of ric rac and glue as you go, give the flower an open bloom look as opposed to closed flat bud
(I have rolled it loosely for the benefit of the photos)


Keep rolling until you have the desired size of flower. 


Cut ric rac and secure by gluing the end piece under your flower 

then add to your layout as Cathy has done above


and just quickly before we go

with all the HUGE range of mediums out there, we have so many options to colour ric rac and ribbonS  to suit your layouts (and give it some texture) ...

Here a few mediums I have played with on our ric rac to show you what it will take ...
(for the record Glimmer Mist also works perfectly but I ran out of time and sunshine to get photos)


Hope our mega long post gave you a few ideas (or reminders) of incorporating ribbon into your creations

Wishing you all a fun and creative weekend


Wednesday, July 20, 2011

Ric Rac Ribbon with Jess

Well Hello there my GORGEOUS Bloggin' Buddies!

Sooooo I have some ric rac goodness for you today.....
It's Ribbon week at the AWESOME my2angels......and there is LOTS to show you on the Blog

Now I think ric rac is one of those things that we don't use enough.....
It doesn't have to be the main player, or focal point on your page.....but it's so fab for adding texture and layers....
AND ITS CHEAP AS CHIPS!!!

Sooooo I have 2 layouts to show you guys....
First up is a layout I've done using the Bo Bunny - Blast Off paper range and stickers, Yellow Ric Rac, Dark Blue Scroll Felt Star, Dark Blue Felt Embossed Star, Scrapware Blastoff Chippy (rocket), Red Paint Dabber (on rocket), Glimmer Glaze - Oil Slick (splats on page) and  Thickers.......


I tied a knot in the ric rac.....just like you would with ribbon and stapled it on....


More stapling.....


Ok on to the second lo.....

On this lo I've used a mix of Sassafras Lass papers & stickers, Woodgrain Hambly Transparency, Red Velvet Ric Rac, Red Twine, Scrapware Penny Farthing Chippy, Glimmer Glaze - Cowboy (on chippy, alphas and splats on page).....

I've also used some FAB chicken wire that Tracy now has in store which you will find in the new arrivals section


I have stitched the ric rac on the patterned paper and; also stapled some on the banner....It adds texture as well as depth to the layers....


Also used a little to accent the top of the page and balance it out...love the juxtaposition of the soft velvet ric rac with the hard metal wire and staples....


And there you have it folks....adding a little bit of something extra to your pages with Ric Rac....

Love and Peace xox

Monday, July 18, 2011

The last of our felt ideas (for now!)

Finishing off our felt week we have ...

Using felt as a mask

Right so you have your backing paper for your layout (or card), in my case I have used Teresa Collins On the Edge Plaid pp
take your felt ribbon, (cut to size) and place down on your paper BACK TO FRONT, so the backing paper is facing you as the picture shows


Then spray with glimmer mist (I used Walnut Gold Glimmer Mist)


Wait to dry then take off your felt and there you have it

and because you used the backside of the ribbon you can now use it again and again as a mask

Then I decided to add some more and create a background for a layout
(which I decided to do AFTER the sun started setting but I am glad I did can you see the stunning colour of the glimmer?)


and here is my completed layout


Our First Day in pin makes a great way to record the date (something I often forget to do!  durrh! I know ... I know ... isn't scrapping about the photo and recording memories!!! I am seriously blonde sometimes!)


Check out the cute owl charm sitting on a piece of felt, bit like a branch ah?  The scrapware foliage was sprayed with Walnut Gold Glimmer Mist as well and just left bare (you can see a slight bit of the gm on the leaves) and our Blue Gardenias with Blue Acrylic Cabochons Flowers are a perfect match with our blue felt ribbon!


Cluster of Blue Flowers


Okay the scrapware notepads I used as a photo mount and embossed the spirals with Zing Silver Metallic Embossing Powder.  
On the background of the notepad, I got out my The Girl Paperie on Holiday stamp (using the one with numbers in a bracket) but because I didn't want the brackets to show I held the stamp in my hand (instead of on an acrylic mount) this enabled me to control the stamp and what I wanted to appear once I heat embossed it with Brown Sugar Zing (I hope that made sense?)


My next layout I used the felt ribbon as a banner , highlighting it with our silver metal stars and blue resin flowers
and also added a piece behind the photo instead of more pattern paper


Using the technique that Cathy used on chipboard a few weeks back (well sort of my version anyway LOL)

I painted the chipboard white then coloured half of it with Glimmer Glaze All That Jazz.

Inked the edges with Jumbo Java then coated them with dimensional magic


This is our circle pendant filled with Glimmer Glaze All That Jazz and added our double star charm while it was still wet (using the glaze as an adhesive as well)


Another layout, using Teresa Collins on the edge papers again (well they match DD's school uniform so well) and they are such beautiful smooth papers to work with

This time I have used the felt ribbon down the centre of the page, and cut bits up from the blue butterfly and flower felt ribbon to add as flourishes
I also cut a few little pieces of our silver glitter ribbon and tucked behind some of the stars on the felt ribbon (thanks Cathy for the idea)


I wiped some Picket Fence Distress Stickles on our blue felt star which is on top of our blue adhesive rhinestone star, tucked in behind the photo


All the photos have been framed with Scrapware ATCs again, and most of them have been coloured faded jeans distress stains (OMG I said it before and I will say it again those stains make colouring chipboard mega quick and easy!)


Every layout must have a charm on it and since it is a sport competition layout
our cheerleader was a must to cheer DD on


so that is felt week

and whilst I could keep going (and reducing my pile of photos to scrap)

we have to move on to

ribbons
and hopefully squeeze in charms and bling before the end of the month

don't forget till the 21st July there is 30% off felt at my2angels

see you back here in a few days

Take Care
Be Safe