Showing posts with label gifts. Show all posts

Thursday, December 11, 2014

Antique Wings and Things Framed Birthday Card

Like the vintage look? Doesn’t matter if you don't - you will love this Antique Wings and Things kit regardless once  you see how stunning (and versatile) it is.


Hi, Susan here again.
 I used this wonderful kit to make a birthday card with a difference.

Here's how I made this card:


Step 1 - Alter Wooden Frame

I picked up a cheap frame from Ikea and altered it to match the
vintage style Antique Wings and Things kit. 
Take the frame apart and lightly sand the frame.  Paint the frame (I painted it cream).  Once dry, sand edges (heavily sand some parts of the edges).  I then randomly rubbed Walnut Stain Distress Ink in places and where the edges were heavily sanded, I rubbed in Inka Gold – Old Gold.


After painted and sanded, randomly rub in Walnut Stain Distress Ink and Inka Gold.

Step 2 - Prepare Back Piece

Cut a piece of thick card the same size as the inside of the wooden frame. 
Paint with Distress Paints (I used Picket Fence).


Using stencilling or modelling paste, stencil your chosen design onto the back piece. 
(I did not stencil all over, however you may wish to - or you may want to stencil the wooden frame instead)


Once stencilling/modelling paste is dry, I painted again with Picket Fence Distress Paint.  Once paint is dry, randomly spray areas with Perfect Pearls/Glimmer Mists. I used Heirloom Gold, Perfect Pearls, Bronze and Powder Blush. If your colours are too strong, use a tissue to remove some colour and once dry, you can also spray all over with Perfect Pearls.

If you don’t have these, you can make your own sprays using Perfect Pearls powders.

A HINT:  If you are impatient like me,
you can use a heat gun to speed up the drying process.


Step 3 - Colour Flowers (if not already the colour you want)
 My2Angels has many flowers (white, cream or coloured) for you to select from.
I changed the white roses using the some of the same colours I used for the back piece - Powder Blush, a small amount of Copper and lastly Perfect Pearls.  I painted just the edges of the rose petals with gold paint using a dry paint brush.

Step 4 - Alter Other Pieces

I also used some muslin and a white crochet doily, both of which I changed the colour of with tea
to give a more vintage look.

I found a cheap metal frame, which I spray painted cream.  Once dry, I lightly sanded the raised parts of the frame and rubbed in Inka Gold – Old Gold onto the raised areas.


Step 5 - Put Frame Card Together

Adhere your prepared back piece to the wooden frame backing and place back into the wooden frame.
Adhere strips of pearls around the inside edge of the wooden rame.

Stamp 'Happy Birthday' onto cream card and cut out with circle punch. Adhere into brass frame from the kit and adhere the epoxy circle on top of this. Adhere to wooden frame.


Stamp sentiment onto the frame (if you wish).

Adhere an Antique Bronze Large Flower Filigree to the bottom of the frame.  Adhere a piece of muslin onto the filigree flower.  

 Using Scrap Dots Silicon Glue (or similar), adhere the white roses which have been coloured.  

 You can then stick pieces of Ivory Pearl Garland in between the roses, making sure they are pushed into the silicon glue.


Finish putting together as per the sample pictured.


Sunday, October 26, 2014

Grunge Time Charming Frame - the boys' version!


You've seen the pretty, girly version of the Grunge Time Charming Frame kit (see the finished sample here) and here is a version for the boys! 


Same kit, different theme. At $3.50 they're a steal.
I spray painted my clock piece with some stone effect spray paint, but you could use a different medium like Ferro or Distress Embossing Enamel) to get a similar effect:


Next, glue the frame on a piece of acetate with Glossy Accents or Dimensional Magic and adhere a die-cut round photo behind that:


Fill in the spaces between the Roman numerals with Crackle Medium or Distress Crackle Paint to get some cool cracks in your "glass":


Place the acrylic block on some cool paper, trace around it and cut it out. Shade the edges with Distress Ink and glue it to the acrylic block with Glossy Accents or Dimensional Magic:


To give the chipboard cogs a cool grungy look, heat emboss them in several layers of embossing powders and while still hot, sprinkle on some Micro Beads. Then add one more layer of embossing powder on top and heat one more time. You can also try embedding some Mica Fragments:


Now use a hot glue gun to glue your clock frame into the block's slit and glue down the embossed chipboard and metal cogs:


Gather some boyish embellishments to finish the look. I used:
- the "game over" tile from the Boys to Men Charming Button Collection


- all the metal cog charms from the kit
- a few ball chains
 - more micro beads
- some star sequins (to hide any hot glue mess)


 - a bottle cap embellishment from the Grunge Charming Dates set


Did you know you can get rid of those pesky stringy bits from the hot glue by pointing your heat gun at them for a few seconds? They will melt away! Just don't do it long enough to melt anything else.

As you can see, this frame is most versatile. Just compare the 2 versions and create your own favourite look!


Saturday, October 25, 2014

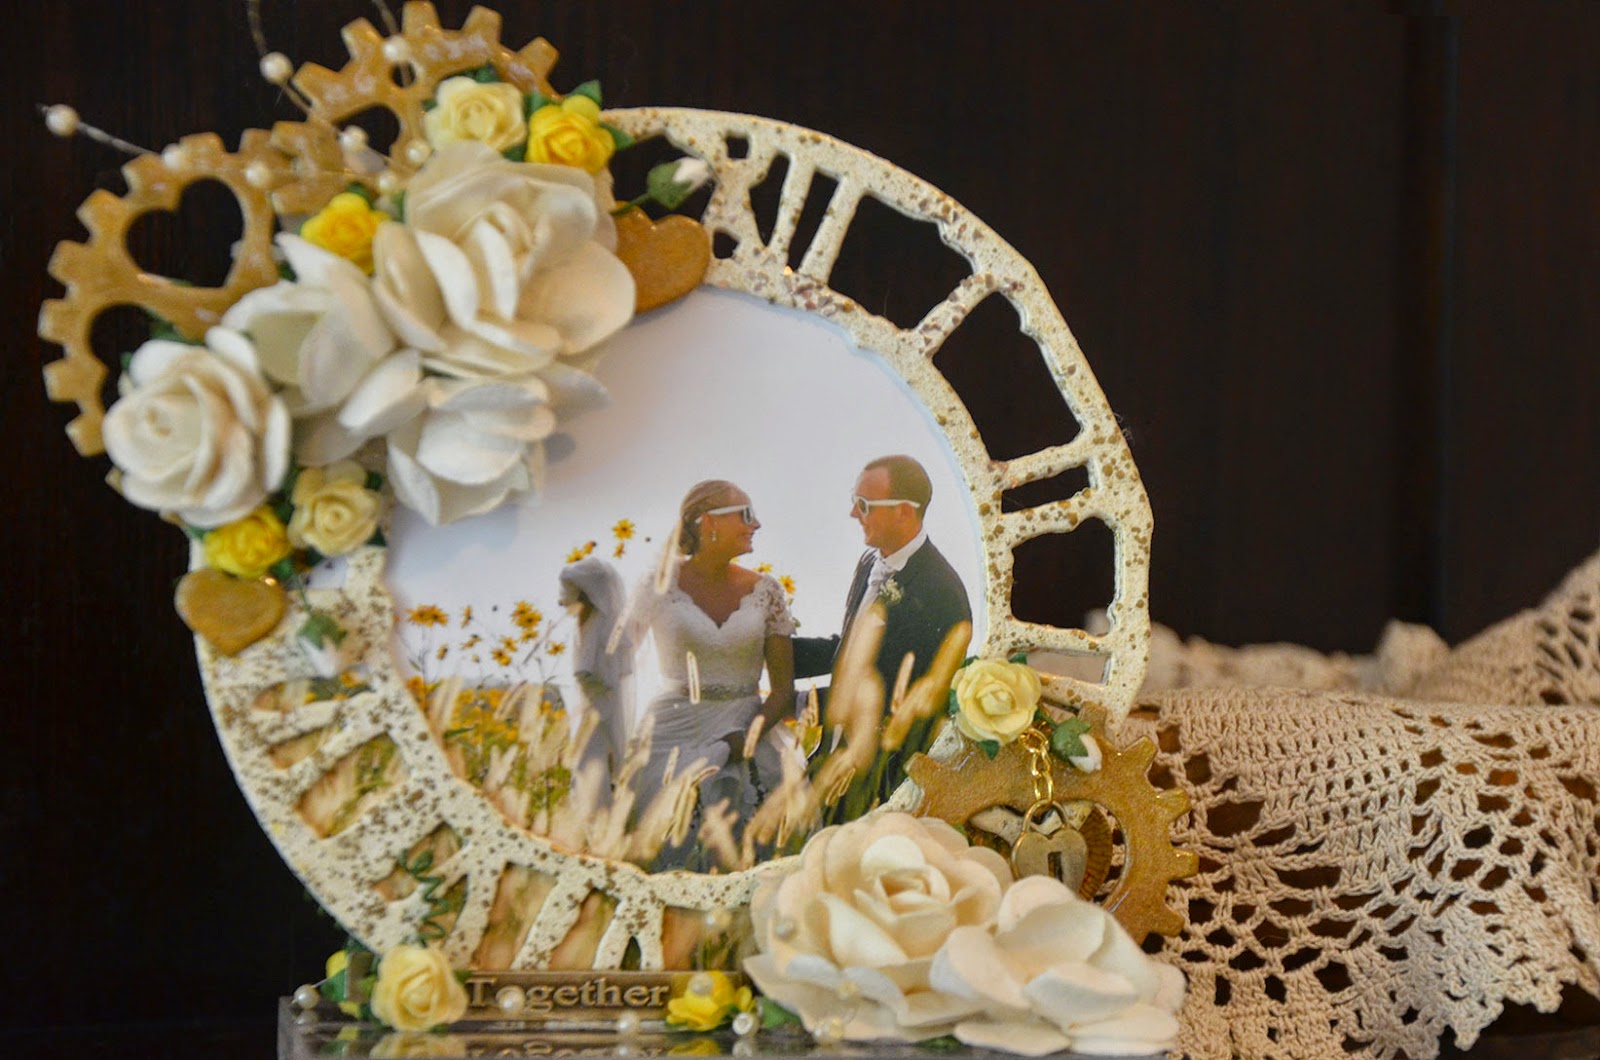
Introducing Grunge Time Charming Frame Kit

I love grunge - it's totally awesome....but some days I love Shabby Chic just a little bit more ;)

The Grunge Time Charming Frame Kit lends itself to any style really...so I chose to make it pretty this time.

With the ''Wedding of the Year'' now over, I find myself with millions of photos to scrap, but I know that it will take me ages to make that happen! Getting one or two out on display fast is a priority, and this little frame kit is perfect for the job. 
Because there are two sides you get to use two photos...Side 1


...and Side 2


The first step for me was covering all the chipboard with white Gesso (acrylic paint will do the job just as well) just so that no brown bits would show through. Then I used Ivory Stampendous Aged Embossing Enamel to cover both sides of each clock die-cut. 
The chipboard cogs, and the hearts that form the holes in them, were all coated (on both sides again) with Tarnished Brass Metallic Distress Stain followed by a coat of Glossy Accents. This gave them a shiny dimensional look...very pretty.

When I put my photos behind the clock 'frames' I decided to cut out the unembellished top edge - it gives the frame a lighter, more delicate look. 

Besides using three of the four included chipboard cogs, and several of the little cut-out hearts, I used two Tag Charms - 'Together' and 'Forever', and a Bronze Heart Locket on a small piece of  Gold Iron Chain. These were brightened up a little bit first with a rub of Brasso.


But...again because there are two sides, you need to make sure you hide the ugly, glued back side of your embellishments. Flowers are the perfect disguisers.

The flowers I used are Large White Roses, White Cherry Blossoms,  Creamy Yellow, Yellow, and Cream 1cm Roses, and some tiny white rose buds. Finally there are a few pieces of Ivory Pearl Garland adding delicacy to the finished look.


All glued into the clear acrylic base - also decorated with roses - it's a lovely addition to any sideboard....simple to make and so pretty. 


Friday, October 24, 2014

Introducing ... Charming Frame Kits

This week, my2angels is introducing a new "Charming ..." range AND a new DT ...

So to start the week - we have Susan and "Rustic Spring".

Introducing our Newest Design Team Member

Susan Martin


Hi, I am Susan,
and I have been interested in all types of arts and crafts since I was a small child. I progressed from making potato and lino-cut prints at primary school to water colours, acrylics and jewellery making, before settling on paper crafts. I have taught folk art and jewellery making and presently teach card making, off-the-page and mixed media projects.


Charming Frame Kits


Introducing "Rustic Spring" - the first in our range of "Charming Frame Kits". Each Frame Kit comes with an acrylic block, Transparency and 2 chipboard frames (so you can have a photo on both sides); as well as an assortment of charms and chipboard shapes.  Each kit costs only $3.50.

In "Rustic Spring," you have an assortment of chipboard flowers and branchlets, as well as some stunning charms. You can glam it up, keep it simple or go shabby chic - whatever suits your own décor.


In "Grunge Time," your frame is a stunning chipboard clock face, which you can adorn with a selection of metal and chipboard cogs. Although 'getting your grunge on' would make for a great frame, the clock/cog elements also lend themselves to a vintage look or even shabby chic (check out the heart shapes in those cogs).


"Picture Perfect" contains a stunning chipboard window fame, as well as a selection of metal and chipboard floral elements. A rustic look or even shabby chic would be a great approach to using this Kit.


We gave Susan "Rustic Spring" to play with and don't you just love what she has done with it?


Here is my first project for the my2angels Design Team.  Below is an example of how you can transform the new my2angels Charming Frame Kit (Rustic Spring) into a finished project.  


Here are a few tips to assist you in customising the colour of your Kit items so that they better suit your needs:

Colour Acrylic Frame Base
·           You can colour the acrylic frame base any colour you wish, however, for glue or paint to adhere, you MUST lightly sand it first.
·            You can paint the base with a couple of light coats of spray paint or a couple of coats of gesso and then finish off with acrylic paint.  You could also use textured paints or other mediums.  Alternatively, you could cover with patterned paper or cardstock.

Colour Frame and Leaves
·             The frames and leaves are raw chipboard; therefore you can paint or ink any colour you wish.

Colour Paper Flowers
·             The flowers in the kit are white, so you can easily change them to a colour that suits your project.  You can use Tim Holtz Distress Inks as I have, or you can colour with dyes, Perfect Pearls/Glimmer Mists; or make your own medium using Perfect Pearls Powders and water.
·             To colour using Tim Holtz Distress Inks:

Swipe the ink pad onto an acrylic stamp block.

Add a couple of drops of water.  The more water, the more subtle the colour.


Using an Aqua Brush or small paint brush (wet with water), paint the watery ink onto the flower.


Colour Felt Hearts
·         The felt hearts are pink, but don’t worry if they are not the correct shade or colour for your project – you can change it.  I made the colour more subtle by using Perfect Pearls Powder to change one heart and by adhering embossed pale pink cardstock to the other.
·               You can totally change the colour by painting the felt heart with acrylic paint or by applying any of a wide range of mediums.  Just remember that because the felt is very absorbent, you will need to repeat several times, allowing that heart to fully dry between each application.
·               To change the shade by using Perfect Pearls Powder:

Push the felt hearts into the VersaMark Watermark Stamp Pad OR cover with Ranger Clear Perfect Pen.

Using a DRY paint brush, generously dust on Perfect Pearls Powder – Perfect Pearl.


Colour Silver Flower Wrap Filigree
·         You can change the look of filigree pieces by painting them.  I spray painted this one.  You can, however, also lightly sand and then paint with gesso and acrylic paint as well.


I really had a wonderful time playing with this Kit - I can just see them making a great present for Christmas or a Christmas holiday project with one of the kids. You might want to get in quick though, as Tracy only has a limited number of each of them.


Thursday, March 7, 2013

Photo Frames for Gifts

While in Ikea a few months back, I came across some frames for only $1.99 and thought how perfect these would be to decorate and give for Birthday Presents.

To prepare the surface, I gave it a light sanding with some sandpaper and covered it with layers of Texture Magic.

For the first frame, I randomly painted areas with Sandal Paint Dabber.


Then I decorated with:


Once happy with their placement, I randomly wiped over the flowers with Sandal Paint Dabber and then painted the frame and embellishments with Claudine Hellmuth Studio Multi-Medium Matt to seal and protect the arrangements.


For my photo, as it was an odd size, I adhered it to some cardstock and heat embossed the cardstock with a flower stamp using Stampendous Aged Embossing Enamel Ivory.


Close ups
(I wish you could see the glimmer shine in these photos!)


On my next frame, I again prepared the surface by giving it a light sanding with some sandpaper and covered it with layers of Texture Magic.

Then I added all my embellishments - starting from the top with our Filigree Flower Flourish centered with a blue rose.

Flowers and embellishments around the base are:

Bee with Clock charm (OOS sorry but we have plenty of other charms that will coordinate)

I then randomly painted over everything with Aqua Paint Dabber. Go easy on the painting of the flowers, you don't want to make them soggy. I just wiped the dabber over them in areas.

To seal and protect - paint all over with Claudine Hellmuth Studio Multi-Medium Matt.

For a final touch, spray Guilded Gold Glimmer Mist over the frame ... far out, this is one stunning Glimmer Mist! I am onto my 2nd bottle LOL

LOOK AT THE GOLD ON THE PAINTED CHARM


I AM IN LOVE  ... lol

Here is the end result ...


... and now with the "hard plastic" inside, which I have stamped over with a flourish pattern, using the Aqua Paint Dabber

(Sorry - it's a bit hard to take photos with the plastic.)


If you haven't used the Adirondack Acrylic Paint Dabbers, you must!  They have a dabber top, eliminating the need for a paint brush, BUT if you want to paint in small areas that the dabber can't get into or for large areas, you can unscrew the top and use your paint brush.